Integration Templates
Optimise's Universal Tracking is ready to integrate with a number of 3rd party tracking and e-commerce platforms.
If you haven't already, please read our Universal Conversion Tag setup guide — this will advise what data should be added to your conversion tags, alongside our latest guidance on Browser Privacy Controls, ensuring that your 3rd party solution will mitigate these impacts.
See our Parameters Section to see what data should be added to your conversion tags.
BigCommerce
Configure the Universal Tag in Big Commerce
-
Login to your BigCommerce admin panel
-
Navigate to Storefront > Script Manager
-
Click the Create a Script button configuring as follows:
- Location on Page = Footer
- Select pages where script will be added = All Pages
- Script Type = Script
-
Add the following code:
<script type="text/javascript">OMID={%MID%};OPID={%PID%};ORef=escape(window.parent.location.href);!function(){var a=document.createElement("script");a.type="text/javascript",a.async=!0,a.src="//track.omguk.com/e/qs/?action=Content&MID="+OMID+"&PID="+OPID+"&ref="+ORef;var b=document.getElementsByTagName("body")[0];if(b)b.appendChild(a,b);else{var b=document.getElementsByTagName("script")[0];b.parentNode.insertBefore(a,b)}}();</script>
Ensure you replace %MID% and %PID% with the values supplied to you.
Reference: https://support.bigcommerce.com/s/article/Using-Script-Manager
Configure the Conversion Tag in Big Commerce
- Navigate to Settings > Data solutions
- Click Connect next to Affiliate Conversion Tracking
- Paste the tracking tag below into the Conversion Tracking Code box and click Connect
<script type='text/javascript' src="https://track.omguk.com/%MID%/e/ss/?AppID=%%ORDER_ID%%&MID=%MID%&PID=%PID%&Status=&Action=Sale&TransactionValue=%%ORDER_SUBTOTAL%%"></script>
<noscript><img border="0" height="1" width="1" src="https://track.omguk.com/e/si/?AppID=%%ORDER_ID%%&MID=%MID%&PID=%PID%&Status=&Action=Sale&TransactionValue=%%ORDER_SUBTOTAL%%"></noscript>
Ensure you replace all instances of %MID% and %PID% with the values supplied to you.
Reference: https://support.bigcommerce.com/s/article/Passing-Order-Data-to-Affiliate-Programs
DoubleClick Floodlight
Basic Template, JavaScript Tag (preferred)
<script type='text/javascript' src="https://track.omguk.com/e/ss/?Status=&MID=%MID%&PID=%PID%&AppID=%pord=!;&TransactionValue=%pcost=!?"></script><noscript><img src="https://track.omguk.com/e/si/?Status=&MID=%MID%&PID=%PID%&AppID=%pord=!;&TransactionValue=%pcost=!?" border="0" height="1" width="1"></noscript>
Pixel:
<img src="https://track.omguk.com/e/si/?Status=%pcost=!;&MID=%MID%&PID=%PID%&AppID=%pord=!?" border="0" height="1" width="1">
We recommend configuring the tag in Default mode.
See Publisher mode vs Default mode below.
Basic Template, Extended Data (preferred)
<script type='text/javascript' src="https://track.omguk.com/e/ss/?MID=%MID%&PID=%PID%&Status=&TransactionValue=%pcost=!;&Ex1=%pu12=!;&AppID=%pord=!?"></script>
<noscript><img src="https://track.omguk.com/e/si/?MID=%MID%&PID=%PID%&Status=&TransactionValue=%pcost=!;&Ex1=%pu12=!;&AppID=%pord=!?" border="0" height="1" width="1"></noscript>
Basic Template, Pixel
<img src="https://track.omguk.com/e/si/?MID=%MID%&PID=%PID%&Status=&TransactionValue=%pcost=!;&Ex1=%pu12=!;&AppID=%pord=!?" border="0" height="1" width="1"/>
- DoubleClick Macros start with a %p and finish with a =!; For example:
- The last Macro must with finish with a =!? (otherwise all parameters will be appended to the end of the string)
Doubleclick Floodlight Example
Example of a Doubleclick Floodlight tag on Advertiser confirmation page:
<iframe src="https://5737208.fls.doubleclick.net/activityi;src=5737208;type=thank0;cat=reser0;qty=1;cost=%JS_TotalCostWithTax%;u1=%JS_ArrivalDtYYYYMMDD%;u2=%JS_DepartDtYYYYMMDD%;u3=%JS_NightsQty%;u4=%JS_CCountry%;u5=%JS_GuestQty%;u6=%JS_ChildQty%;u7=%JS_RmQty%;u8=%JS_RoomName%;u9=%JS_TotalCost%;u10=%JS_CurrCode%;u11=%JS_RateName%;u12=%JS_HName%;u13=%JS_LangCode%;dc_lat=;dc_rdid=;tag_for_child_directed_treatment=;ord=%JS_ConfirmNo%?" width="1" height="1" frameborder="0" style="display:none"></iframe>
Implementation
- If you utilise DoubleClick within Google Tag Manager you can take advantage of the Conversion Linker tag to mitigate the impacts of Apple ITP 2.3.
- If the Optimise tag is not being fired by the DoubleClick tag, check that the DoubleClick tag has not been implemented as a pixel — it must be added as an iframe for it to be able to load our tag.
Publisher Mode vs Default Mode
Publisher Mode
- The Optimise tag is only triggered for affiliate activity.
- The Floodlight tag looks for the DoubleClick cookie from the last click.
- It checks if the user came through an Optimise affiliate (e.g., via a link like https://ad.doubleclick.net/ddm/clk/402032186;202198621;s).
- If the user is from an Optimise affiliate, the Optimise Conversion tag is fired.
Default Mode
-
The Optimise tag is triggered for all applications.
-
It looks for an Affiliate ID (AID) in the Optimise cookie if present.
-
Optimise will only track sales if the cookie is found.
- There may be cross-channel duplication if a user clicks an affiliate link and then returns through another network or channel.
-
Monthly Validation Process: All tracked sales are sent for approval or rejection. You can reject any sales wrongly attributed to another channel.
-
Alternative: Use the
Channelparameter in the tag to pass the last referring channel. Configure the Floodlight tag to pass this, and we can set up Optimise to ignore any sales where it wasn't the last referring channel.
DoubleClick Help Article on Floodlight Variables
Google Tag Manager requires that strings end with a semi-colon :, not a question mark ?.
DoubleClick Click Trackers
- Example:
http://ad.doubleclick.net/clk;263036570;88365486;t
Further Information
- Campaign Manager 360 Click Tracking Help
- Troubleshoot Floodlight tags and use implementation alerts
- Custom Floodlight variables
Tealium
Optimise is configured in the Tealium Integrations Marketplace.
To activate Optimise Universal Tracking, both the Universal Tag and Conversion Tag should be enabled.
- https://tealium.com/integrations/optimisemedia_universaltag.php
- https://tealium.com/integrations/optimisemedia_universaltag.php
Configure the Universal Tag in Tealium
Enable the Optimise Universal Tag. Insert the MID & PID provided into the relevant fields.
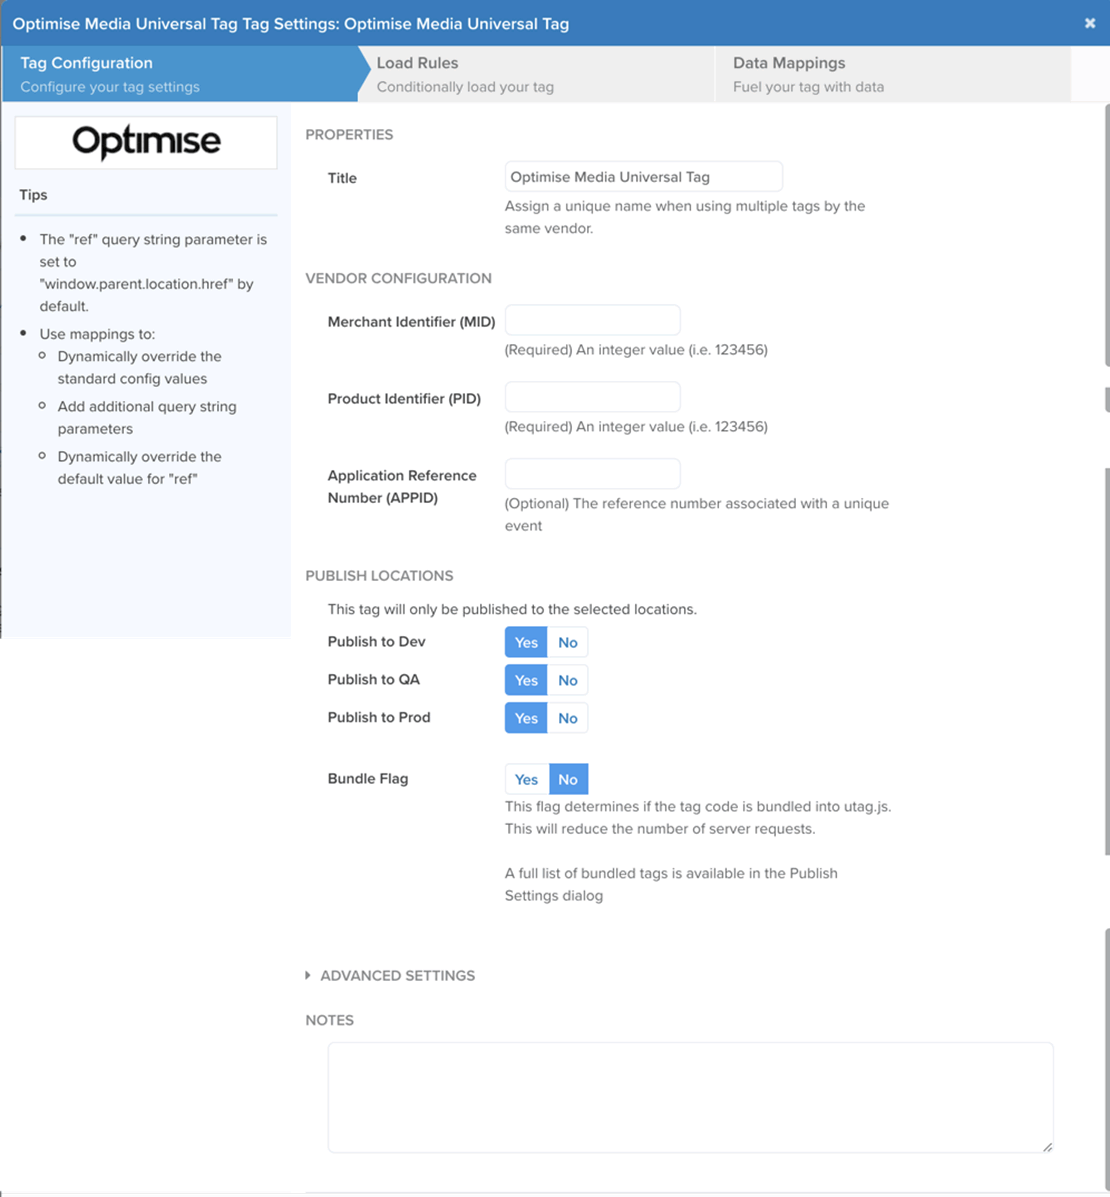
If you're tracking a unique Action such as a Quote or Application, enter the reference number.
Configure the Conversion Tag in Tealium
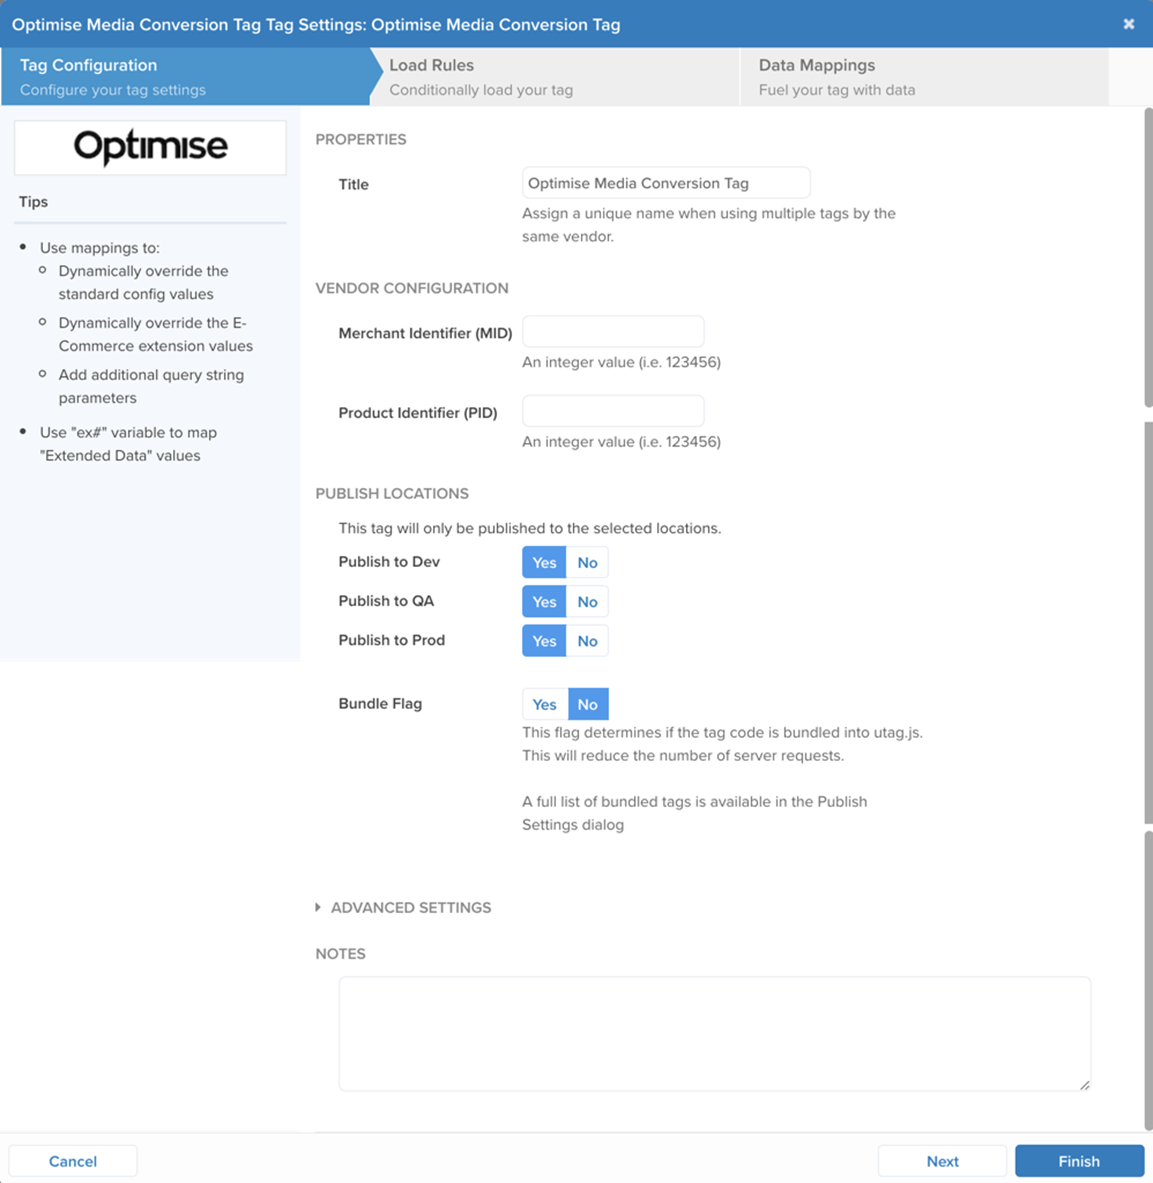
Enable the Optimise Universal Tag. Insert the MID & PID provided into the relevant fields.
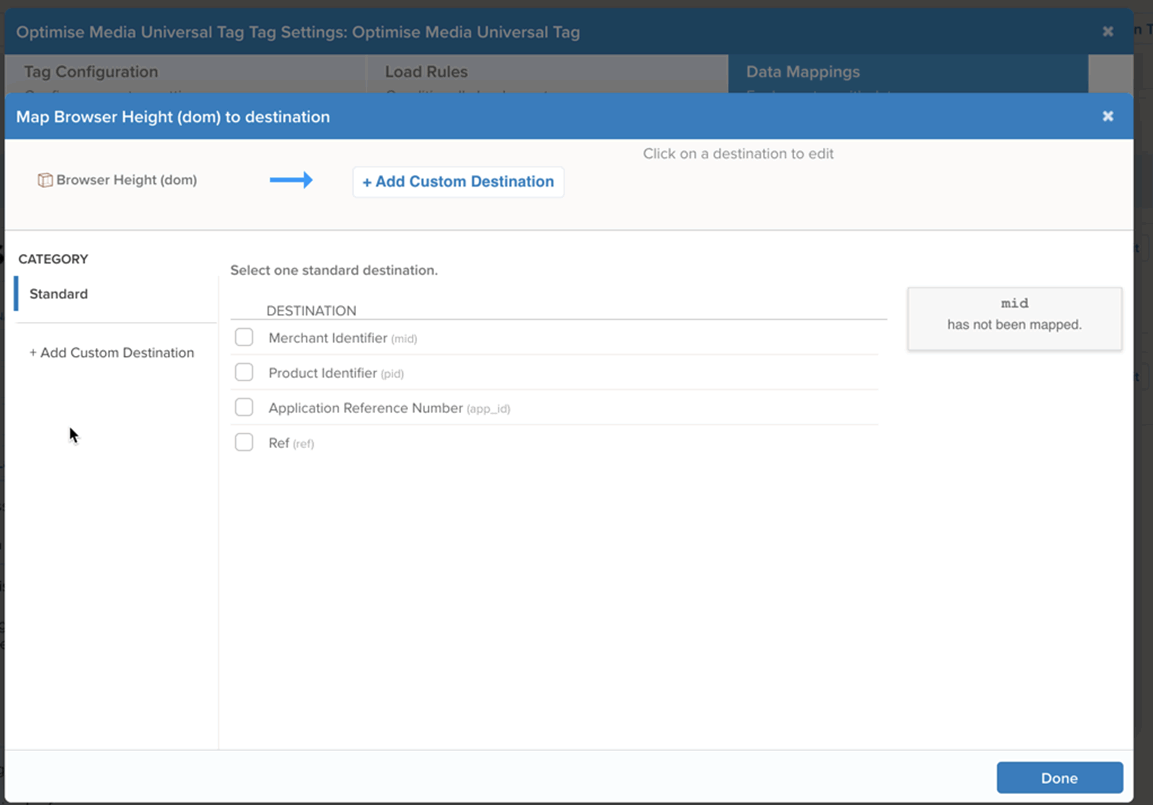
If you are passing Extended Data enter the relevant data variables as shown below.

Ensighten
Optimise is configured in the Ensighten Apps Marketplace. To activate Optimise Universal Tracking, both the Universal Tag and Conversion Tag should be enabled.
-
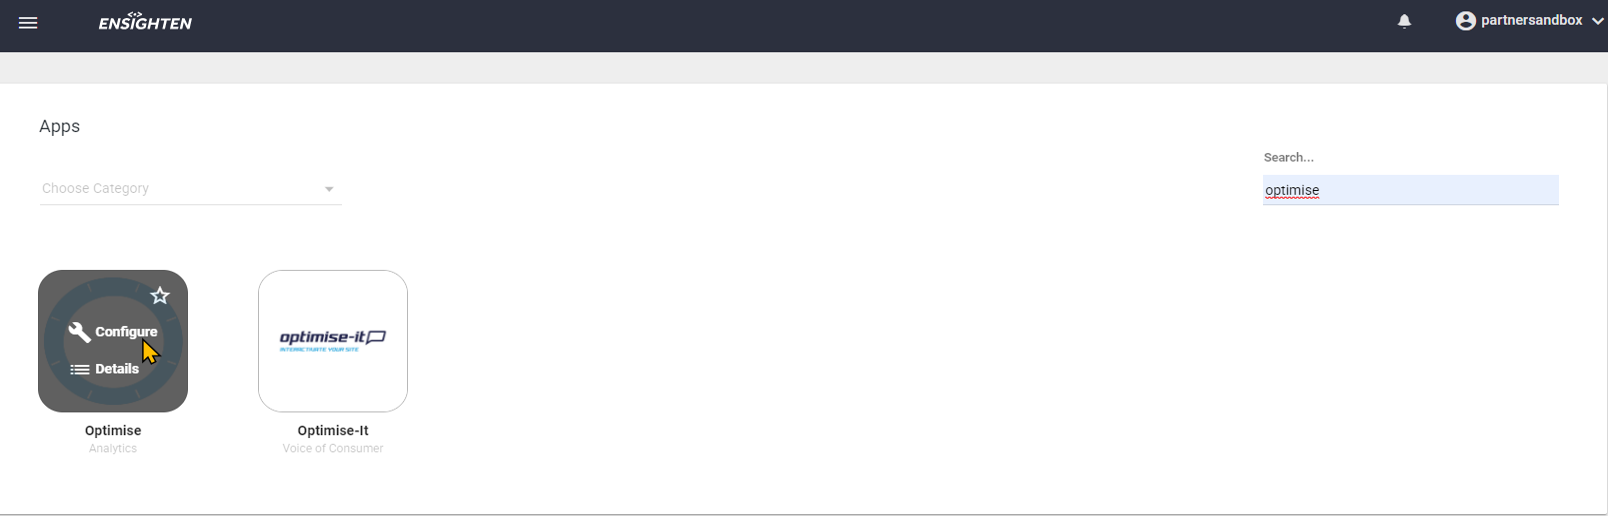
Search and select Optimise in the Ensighten Apps Marketplace
-
Select the tag to setup
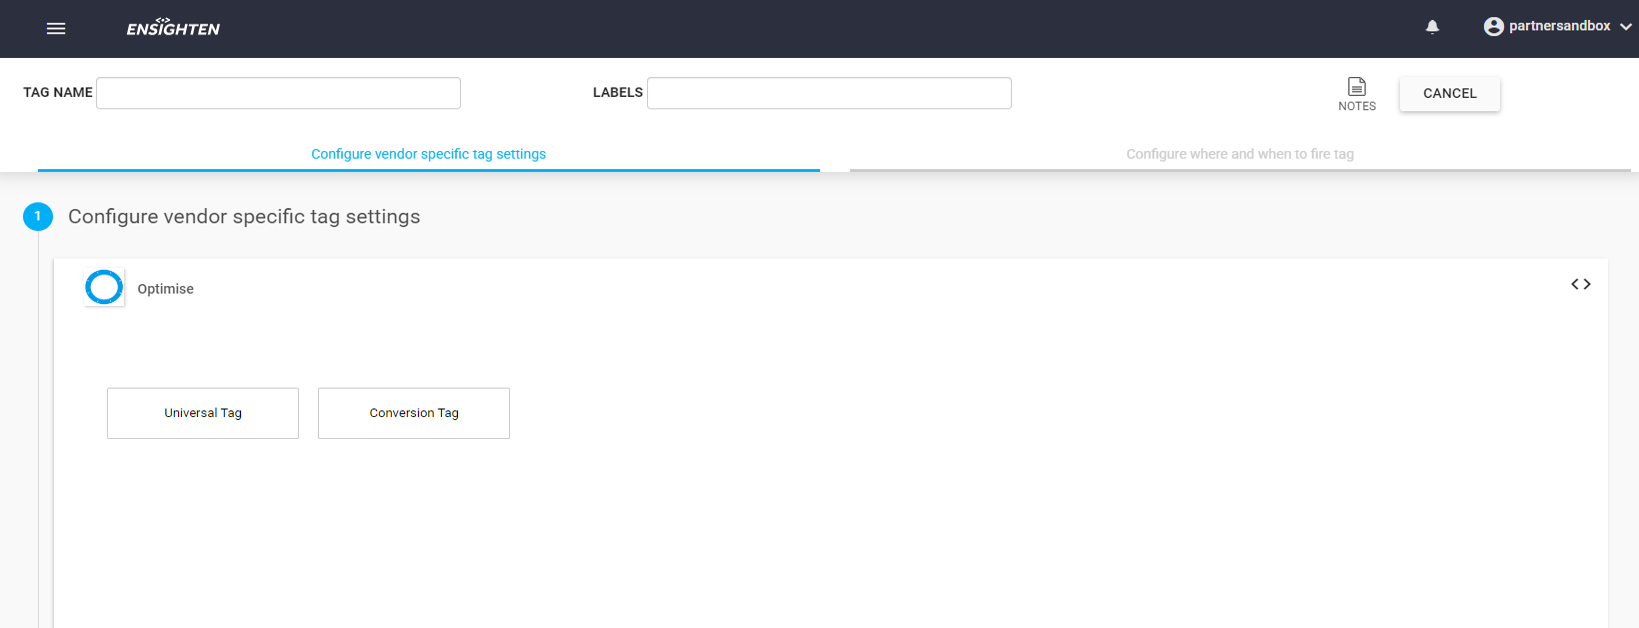
-
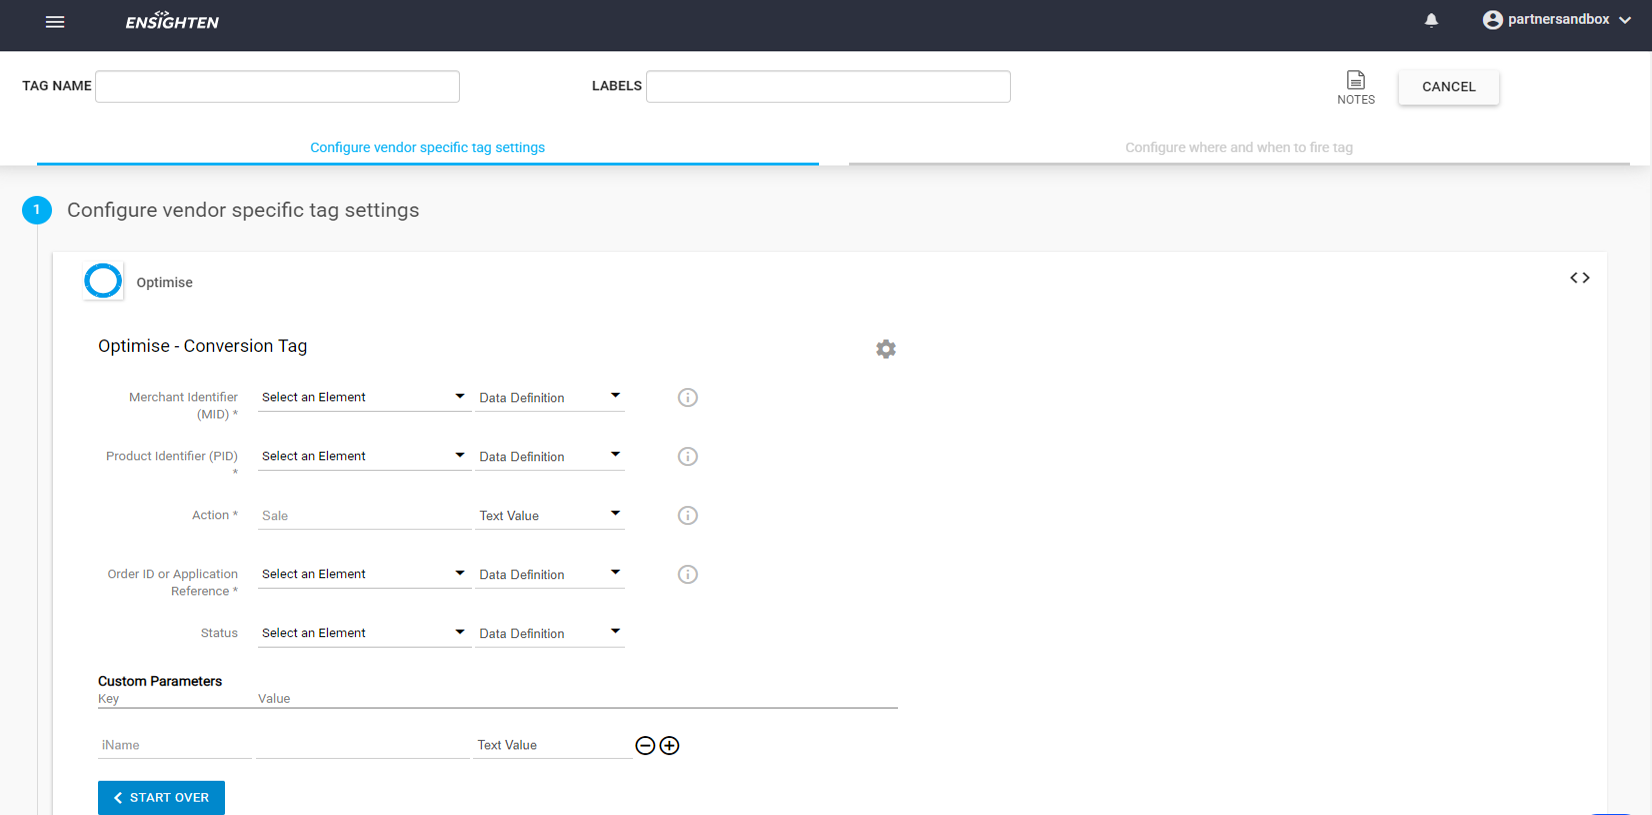
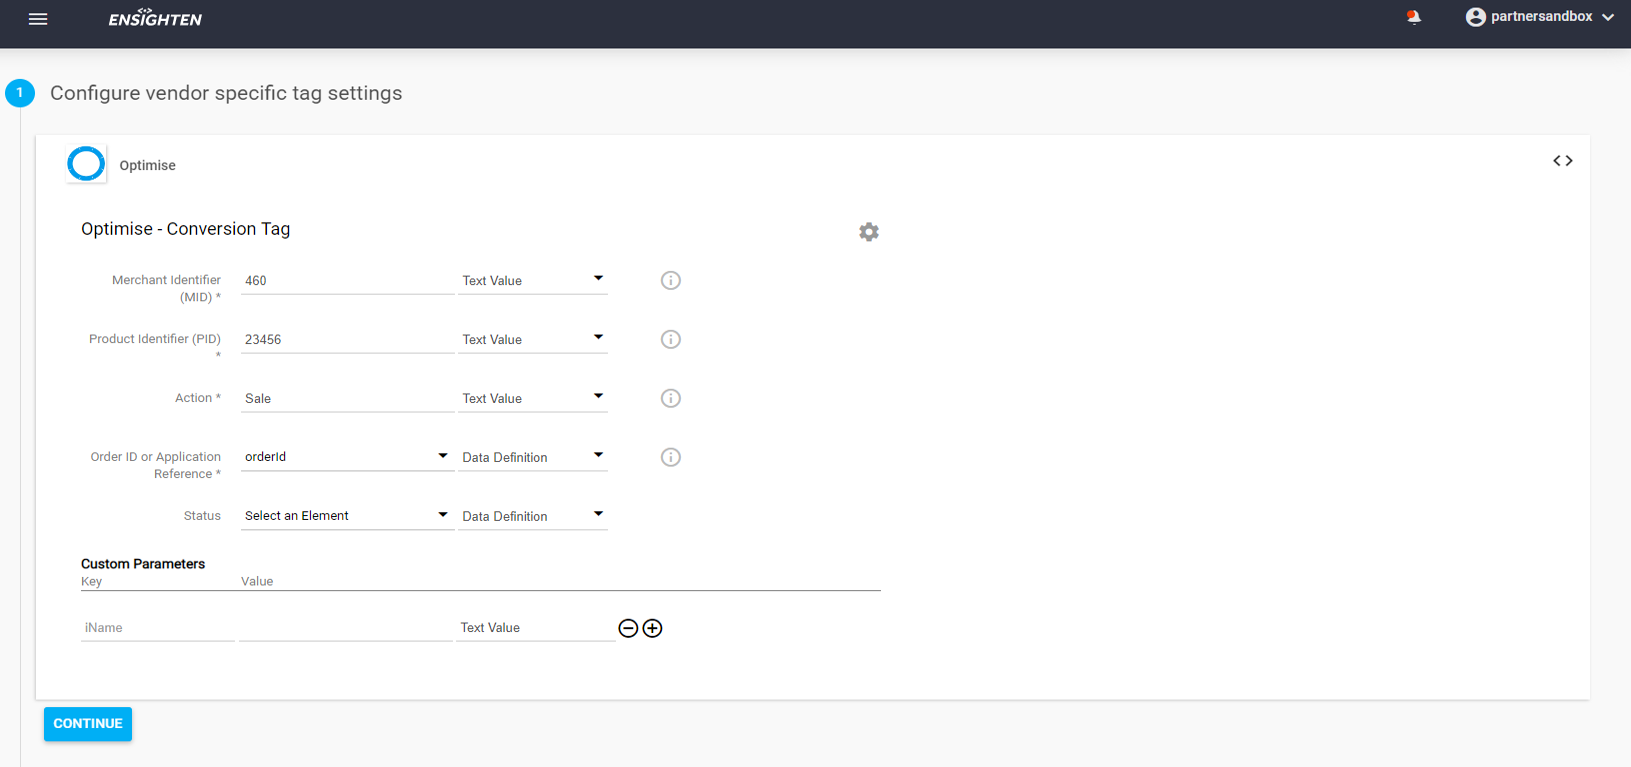
Fill in Merchant Identifier (MID) and the Product Identifier (PID) with the details provided by your Account Manager
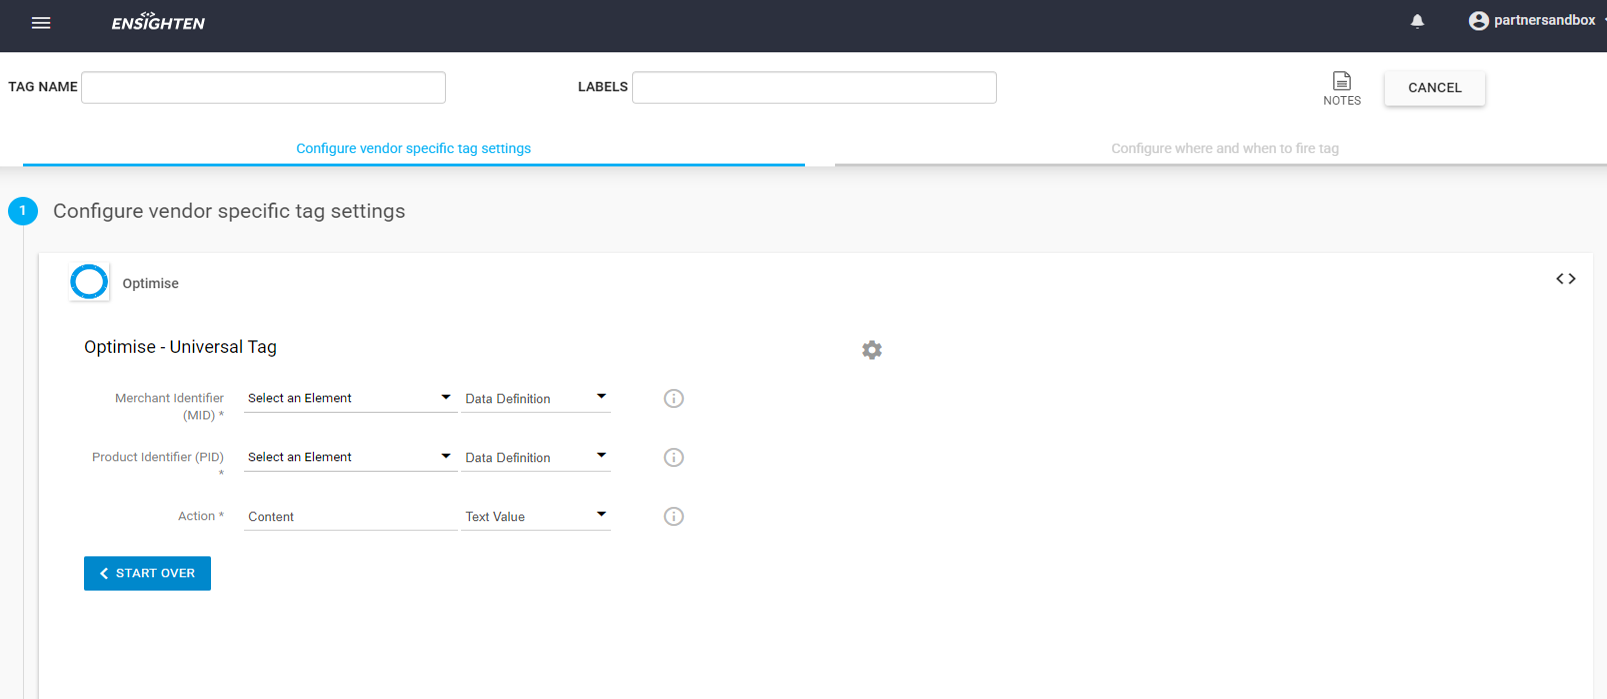
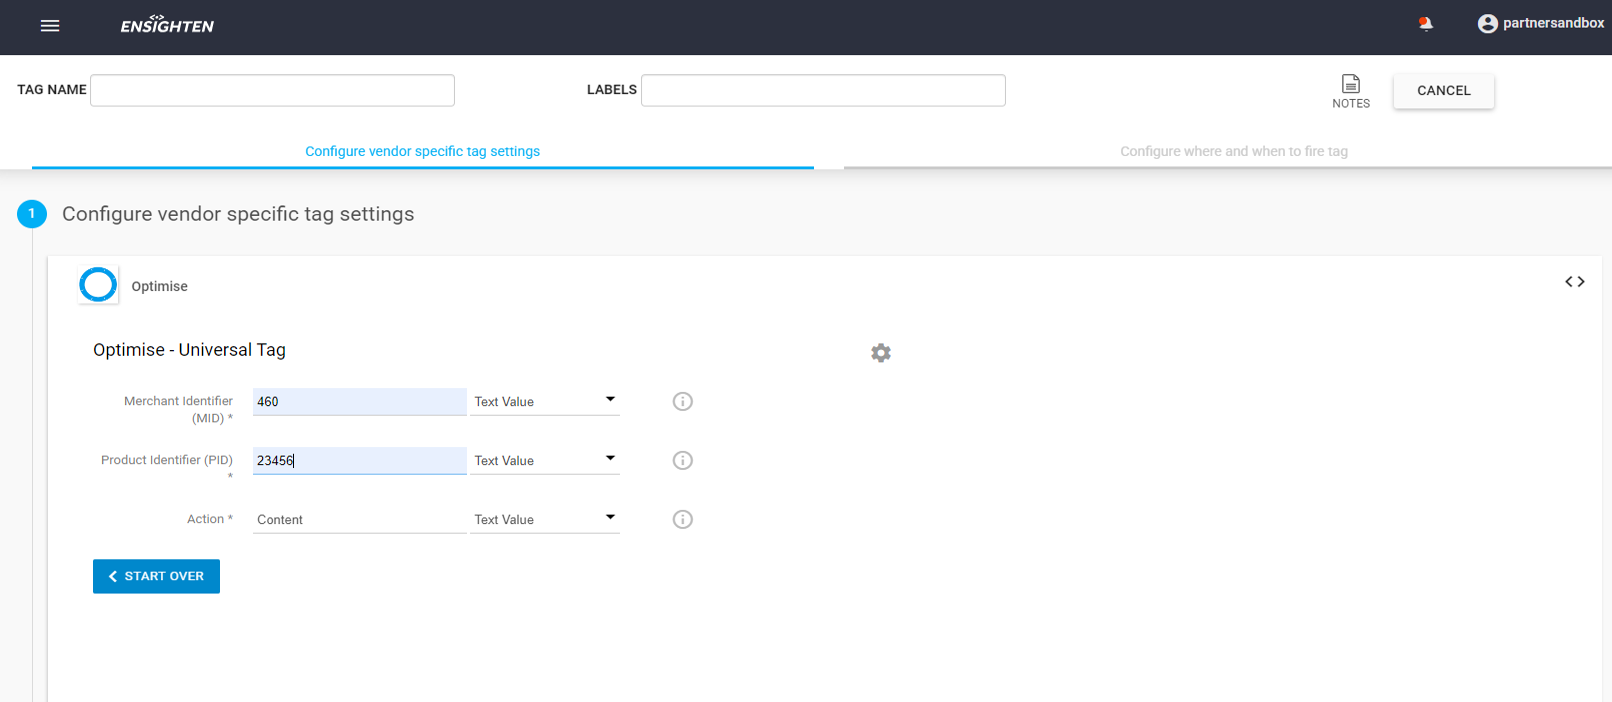
-
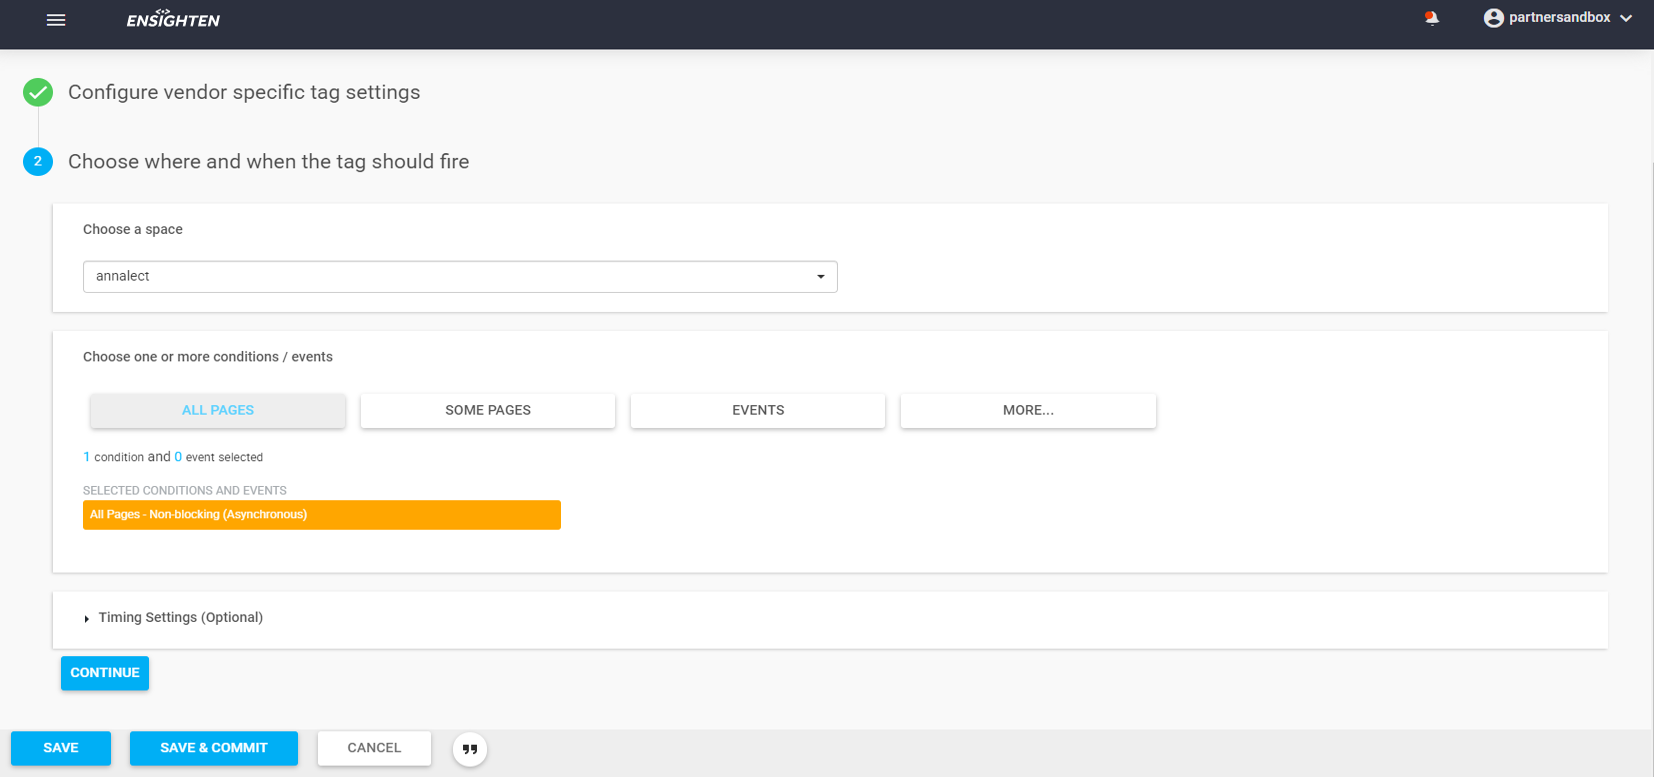
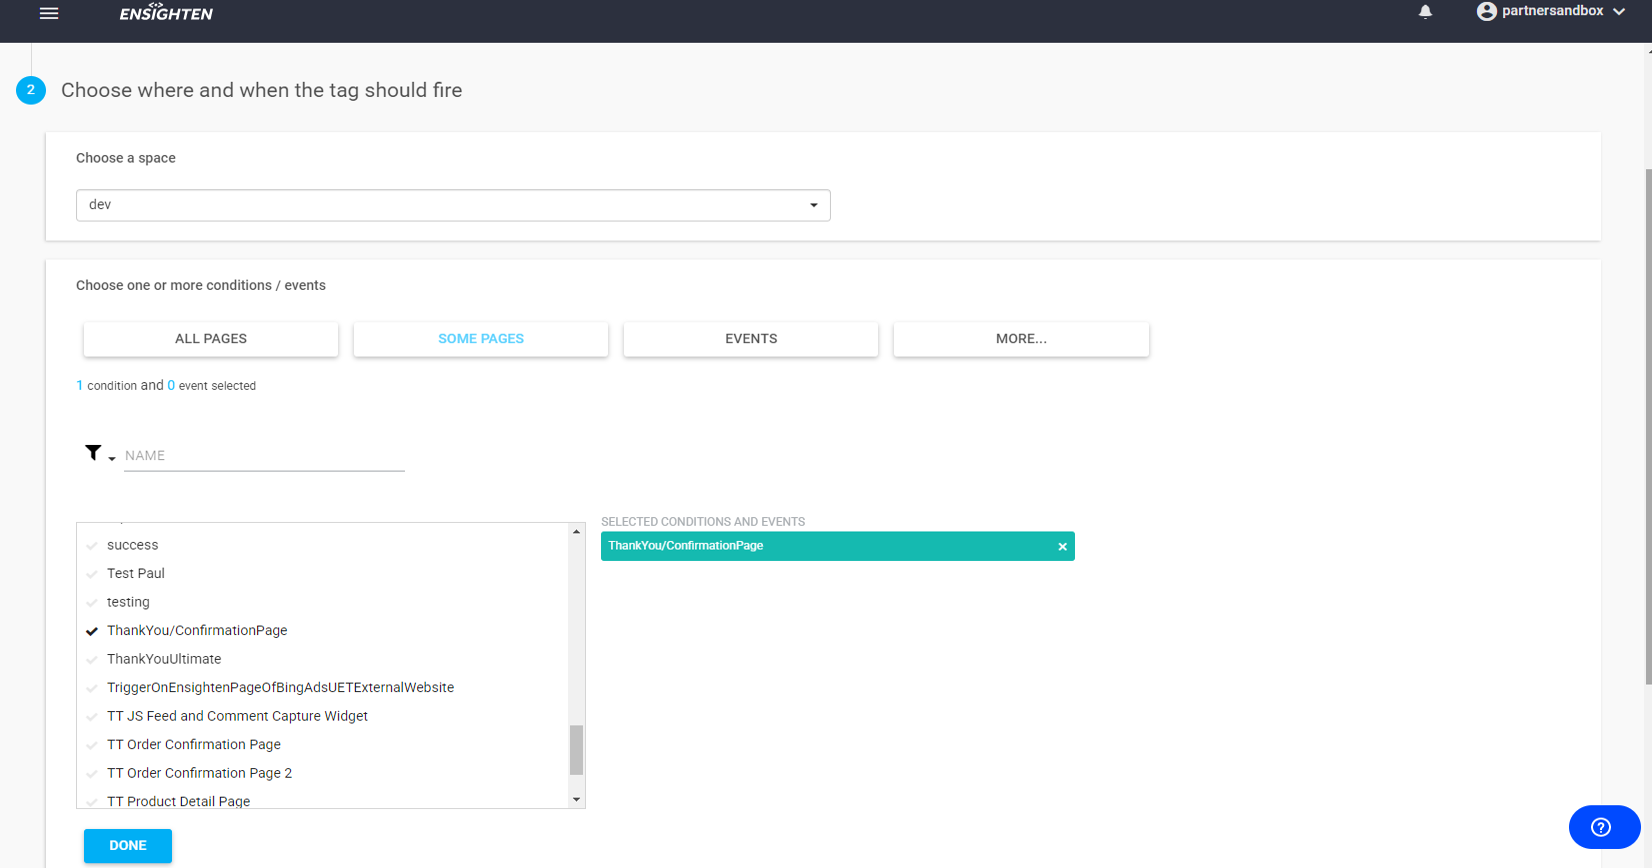
Setup a trigger to determine when the tag should fire. This should normally be on All Pages
-
Fill in Merchant Identifier (MID) and the Product Identifier (PID) with the details provided by your Account Manager. Action will need to be set to 'Sale' and the Order ID or Application Reference is the unique ID generated to attribute the sales across platforms
-
Setup a trigger to determine when the tag should fire. This needs to be on the page directly after the conversion takes place, usually the 'Thank you' page.
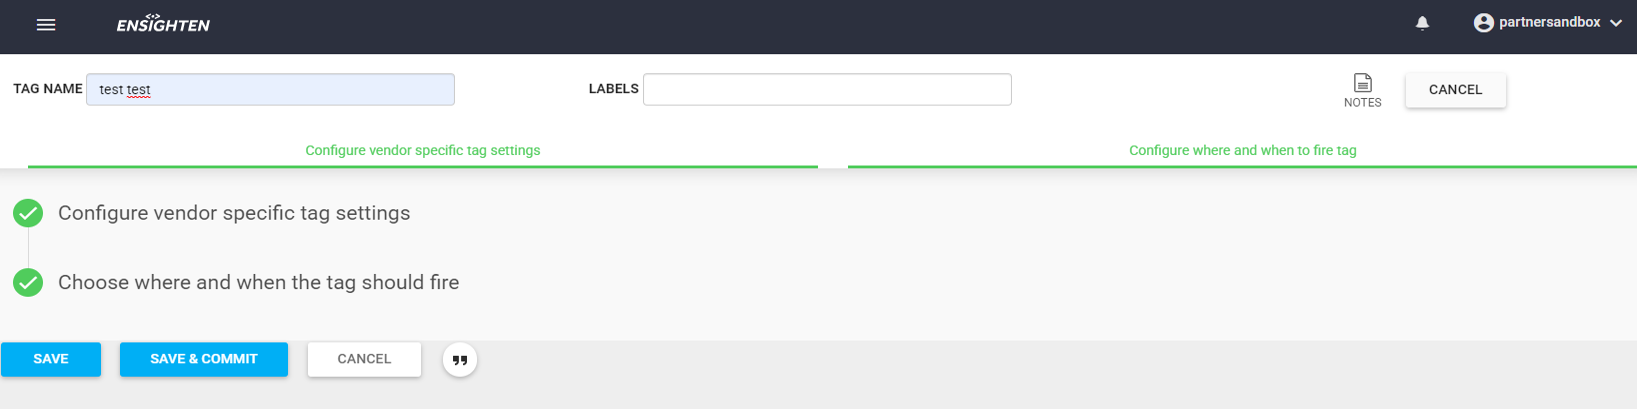
Naming, Saving and Publishing
Google Tag Manager (GTM)
This article assumes you have a basic understanding of dataLayer variables.
Optimise can be integrated with GTM. There are two objectives:
- Add the Universal Event Tag to all pages along your campaign's journey.
- Add the Universal Conversion Tag to the post-sale page.
Login to your GTM account and follow the steps below:
Add the Universal Tag from Template Gallery
- On the left navigation pane, selecting Tags then New.
- Name the tag, and click the Tab Configuration box.
- Select Discover more tag types in the Community Template Gallery.
- Search for Optimise in the top right search bar; select the Optimise Universal Tag.
- Select Add to workspace.
- Check all permissions and confirm adding the community template to the workspace by selecting Add.
- Fill in the details provided by your Account Manager, then click Save.
- For more information please see the Parameters table.
- Select Add trigger.
- When choosing a Trigger, we suggest All Pages for the Universal Tag.
- Once the Trigger has been selected, click Save.
- Select Submit if you are happy with the new tag and trigger setup configuration.
- Give the newly created tag/trigger a version name with an easy to distinguish description.
Add the Conversion Tag from Template Gallery
-
Follow Steps 1-5 on Add the Universal Tag from Template Gallery, selecting the Optimise Conversion Tag instead.
-
Confirm adding the community template to the workspace by selecting Add.
-
Fill in the details provided by your Account Manager, then click Save.
- For more information please see the Parameters table.
-
Select Add trigger.
-
Click the + symbol at the top right.
-
Name the new trigger, for example: Thankyou page.
- Then select Choose a Trigger Type to begin set-up.
-
Select Window Loaded when choosing a trigger type.
-
To configure a new trigger:
- Select Some Window Loaded Events for the trigger fire rule radio button.
- Select Page Path.
- Select Fire on some pages, then put the rule on the last step.
- When ready, click on Save to save the trigger.
-
Select Save.
-
Select Submit.
-
Choose a Version Name, add a unique Version Description then select Publish.
Add the Tag Manually
-
Click on Tags then New.
-
Add a name for your tag and select Tab Configuration, creating a new tag.
-
Select Custom HTML.
-
Copy and paste in the tag provided to you by your Account Manager.
- Replace the current placeholders with the associated dataLayer variable created in GTM. E.g.,
AppID={{SaleReference}}andStatus={{SaleValue}}. - Select Triggering once complete.
- Replace the current placeholders with the associated dataLayer variable created in GTM. E.g.,
- The tag provided under your Campaign in Insights, or by your Account Manager must be used.
- If GTM tags are being used to host affiliate JavaScript tags, it may be necessary to enable document.write in GTM.
-
Select the + symbol at the top right to create a new trigger.
-
Name the Trigger, continuing to Trigger configuration.
-
Select Window Loaded.
-
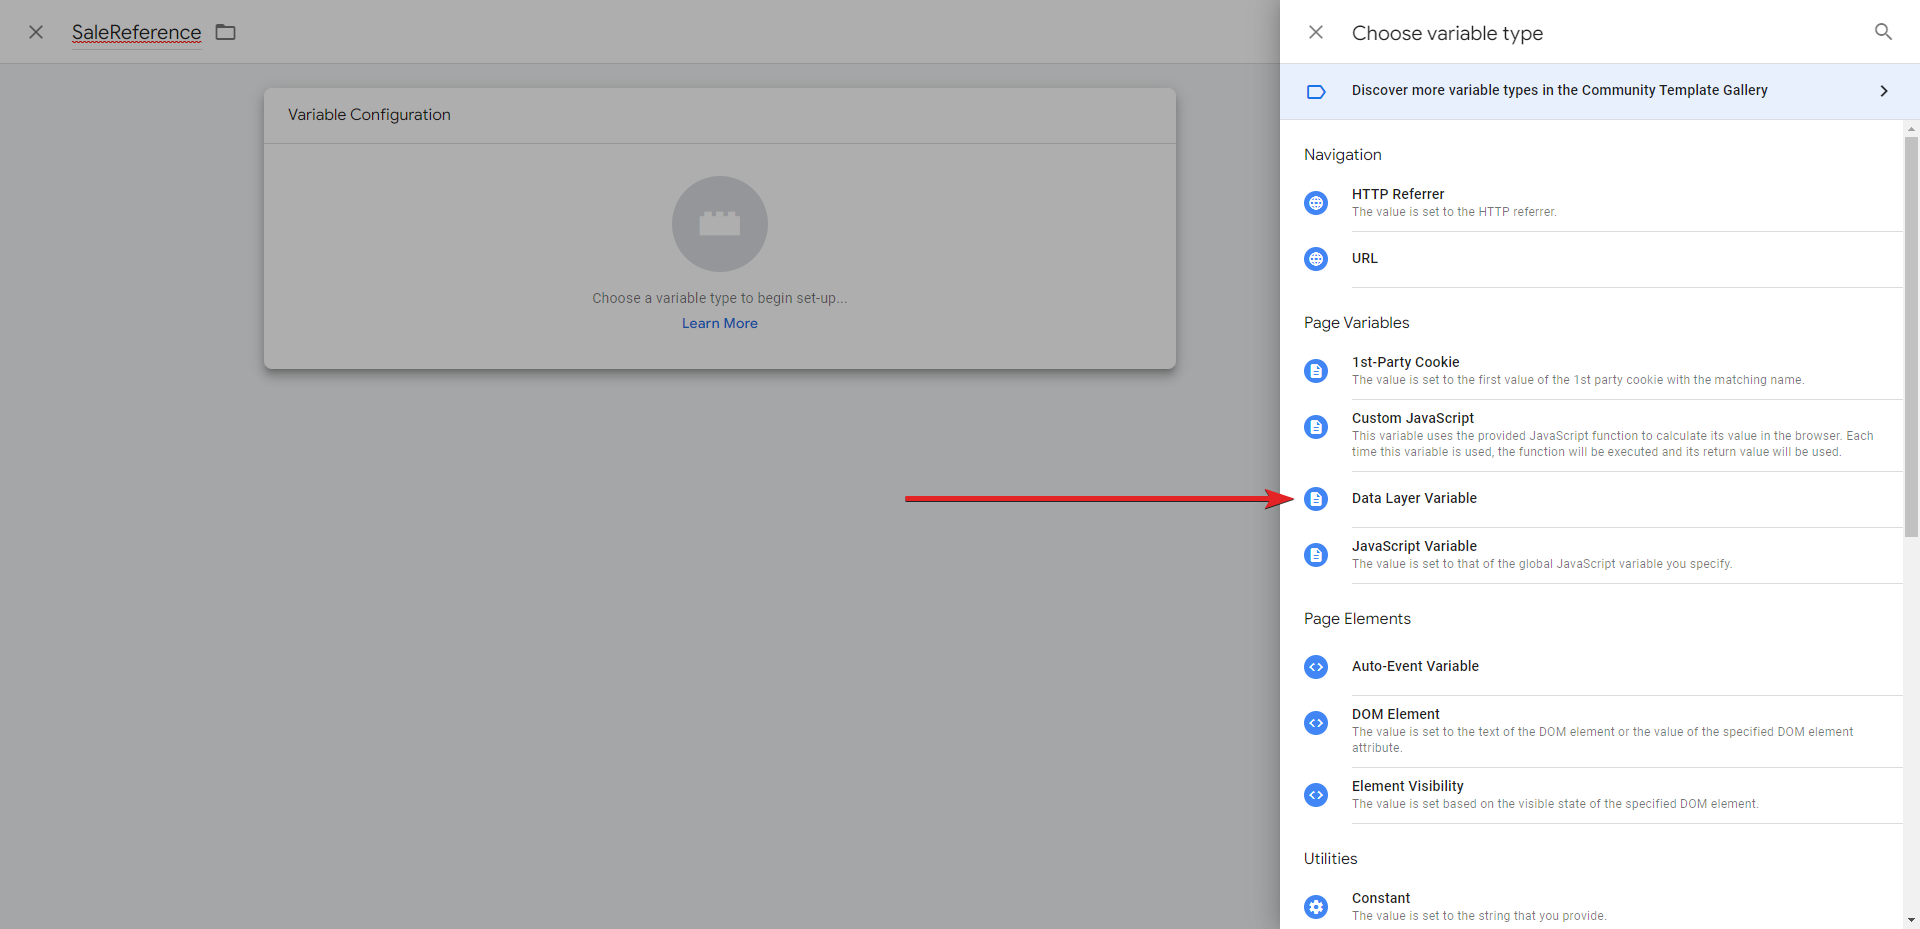
You will then need to choose the variable which fires the tag. If you have not already created a variable then we recommend creating a First Party Cookie variable named
SaleAttribution(see example below):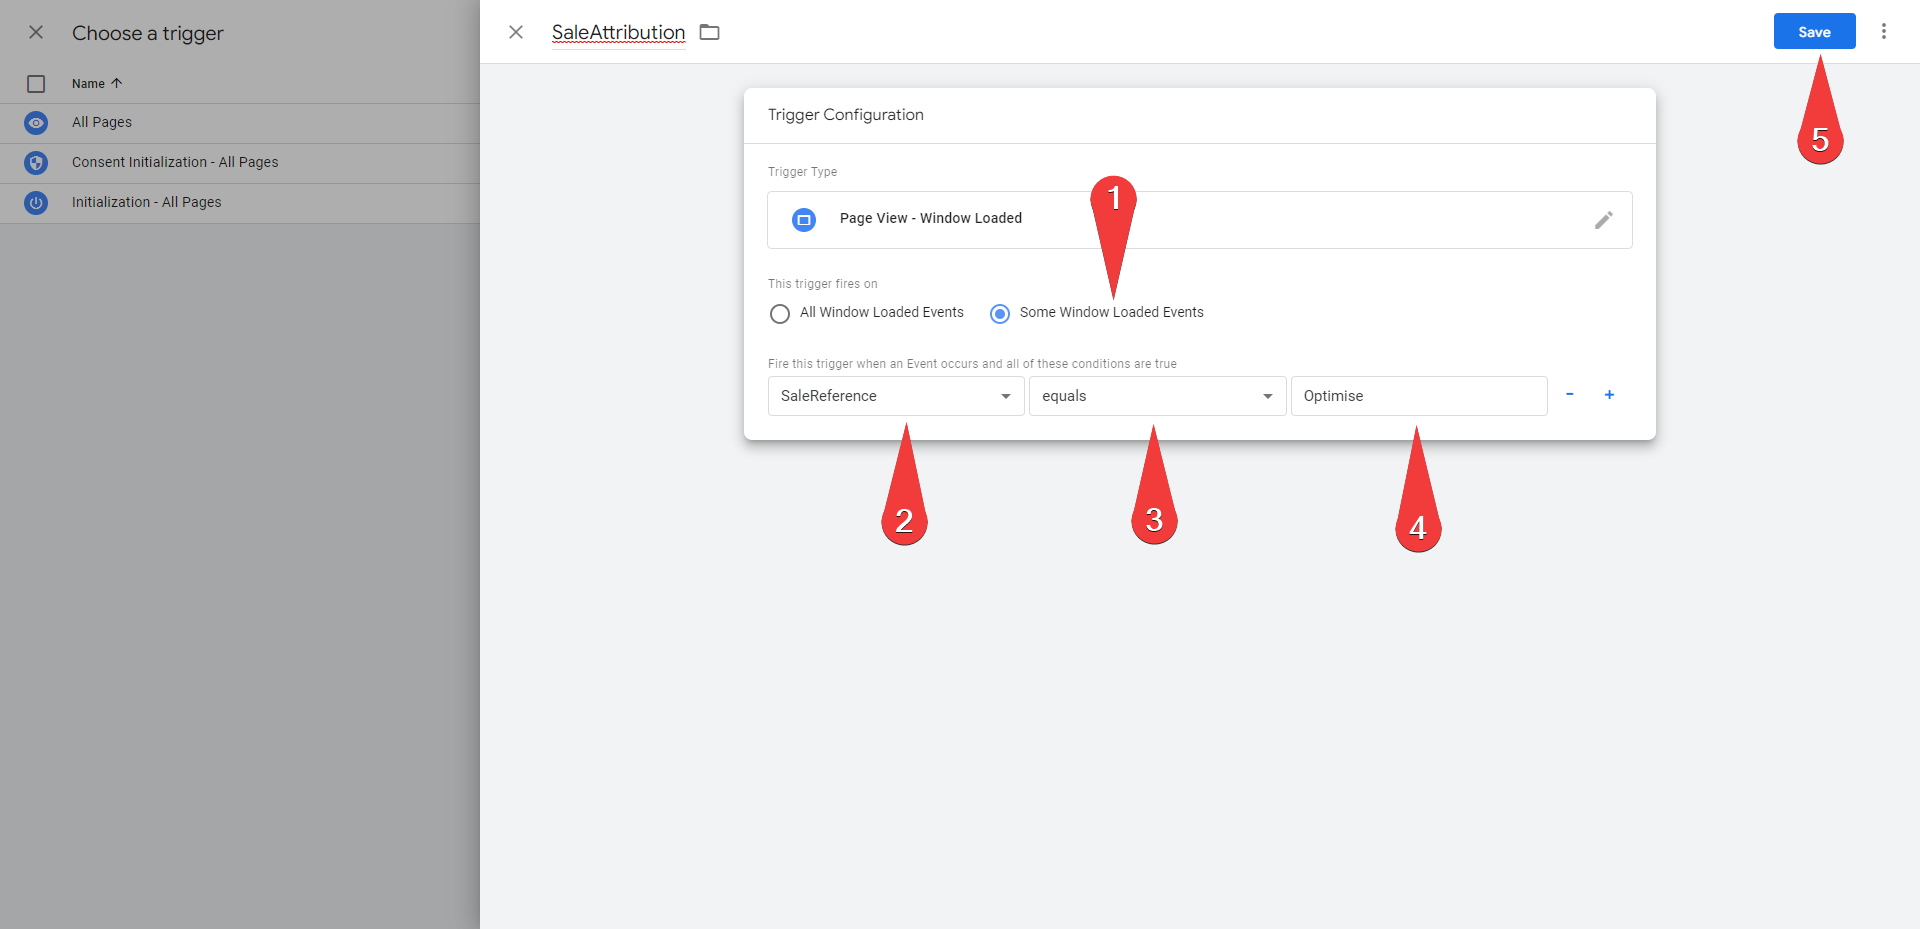
-
Choose Save, then either Save again or Preview your changes.
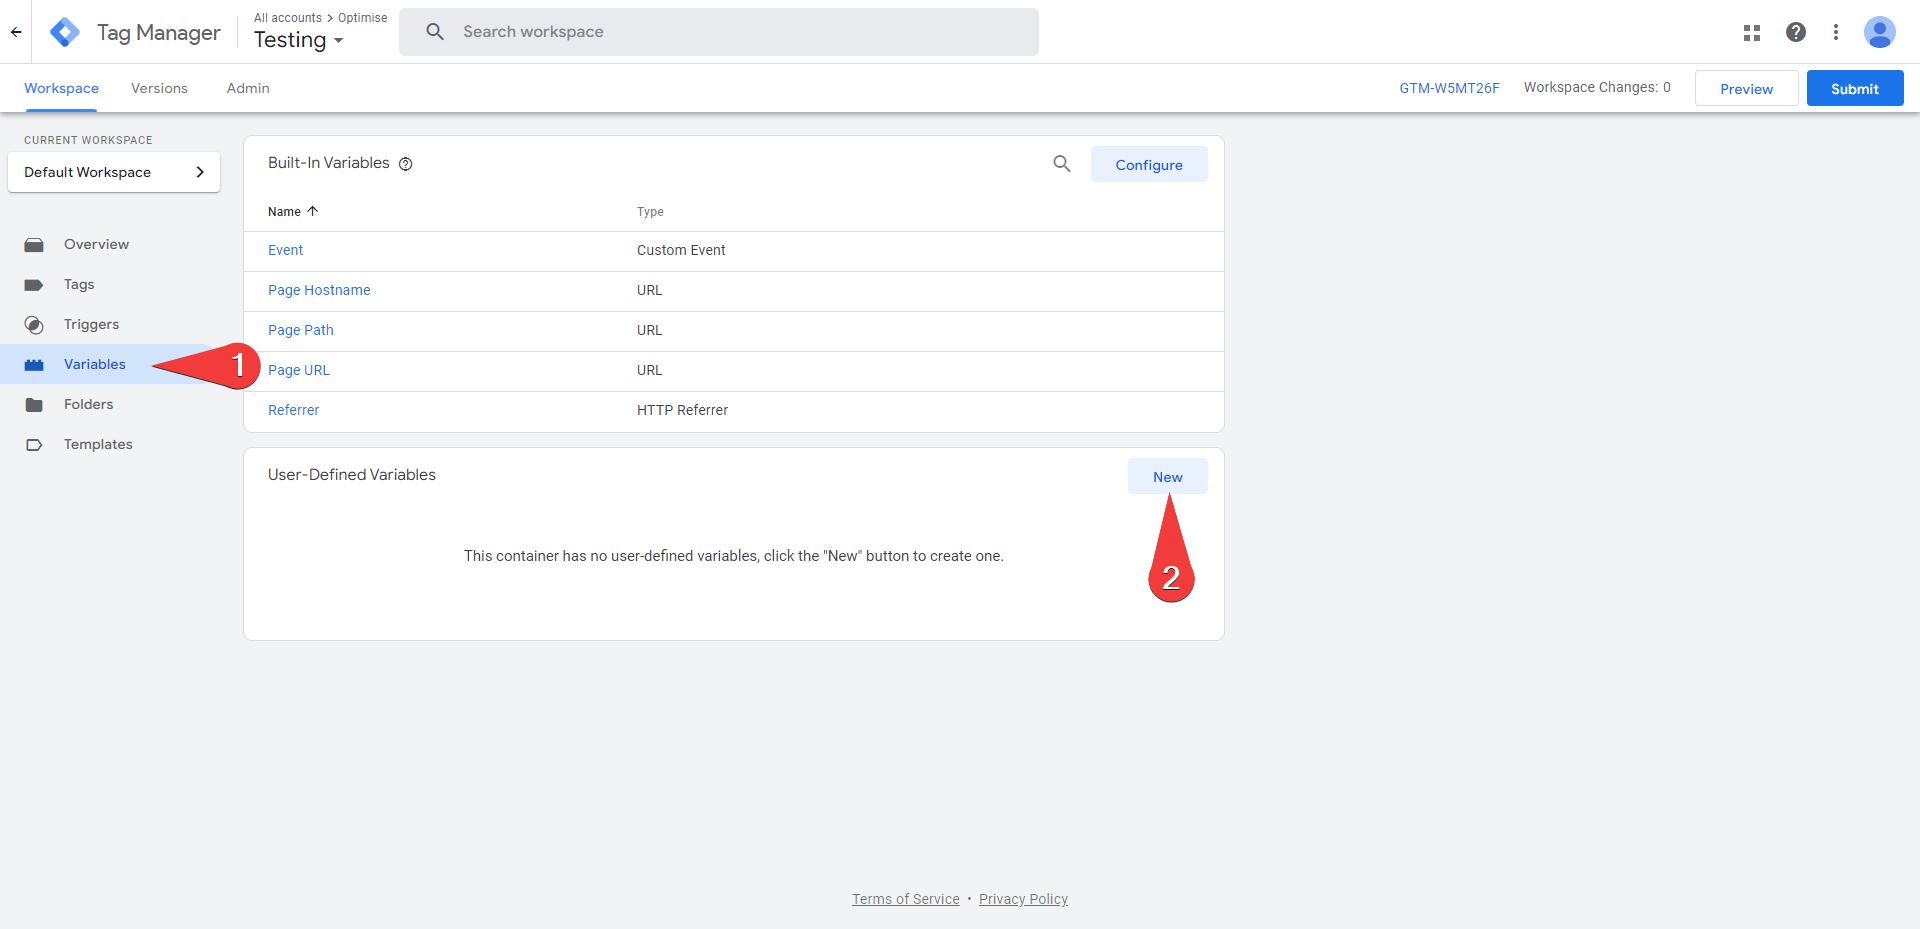
Associate dataLayer variables
-
Add the following JavaScript to your page just above your GTM JavaScript, replacing the values as appropriate:
<script>dataLayer=[{'SaleReference':'ORD-000023','SaleValue':'12.99','VoucherCode':'VOUCHER1234'}];</script> -
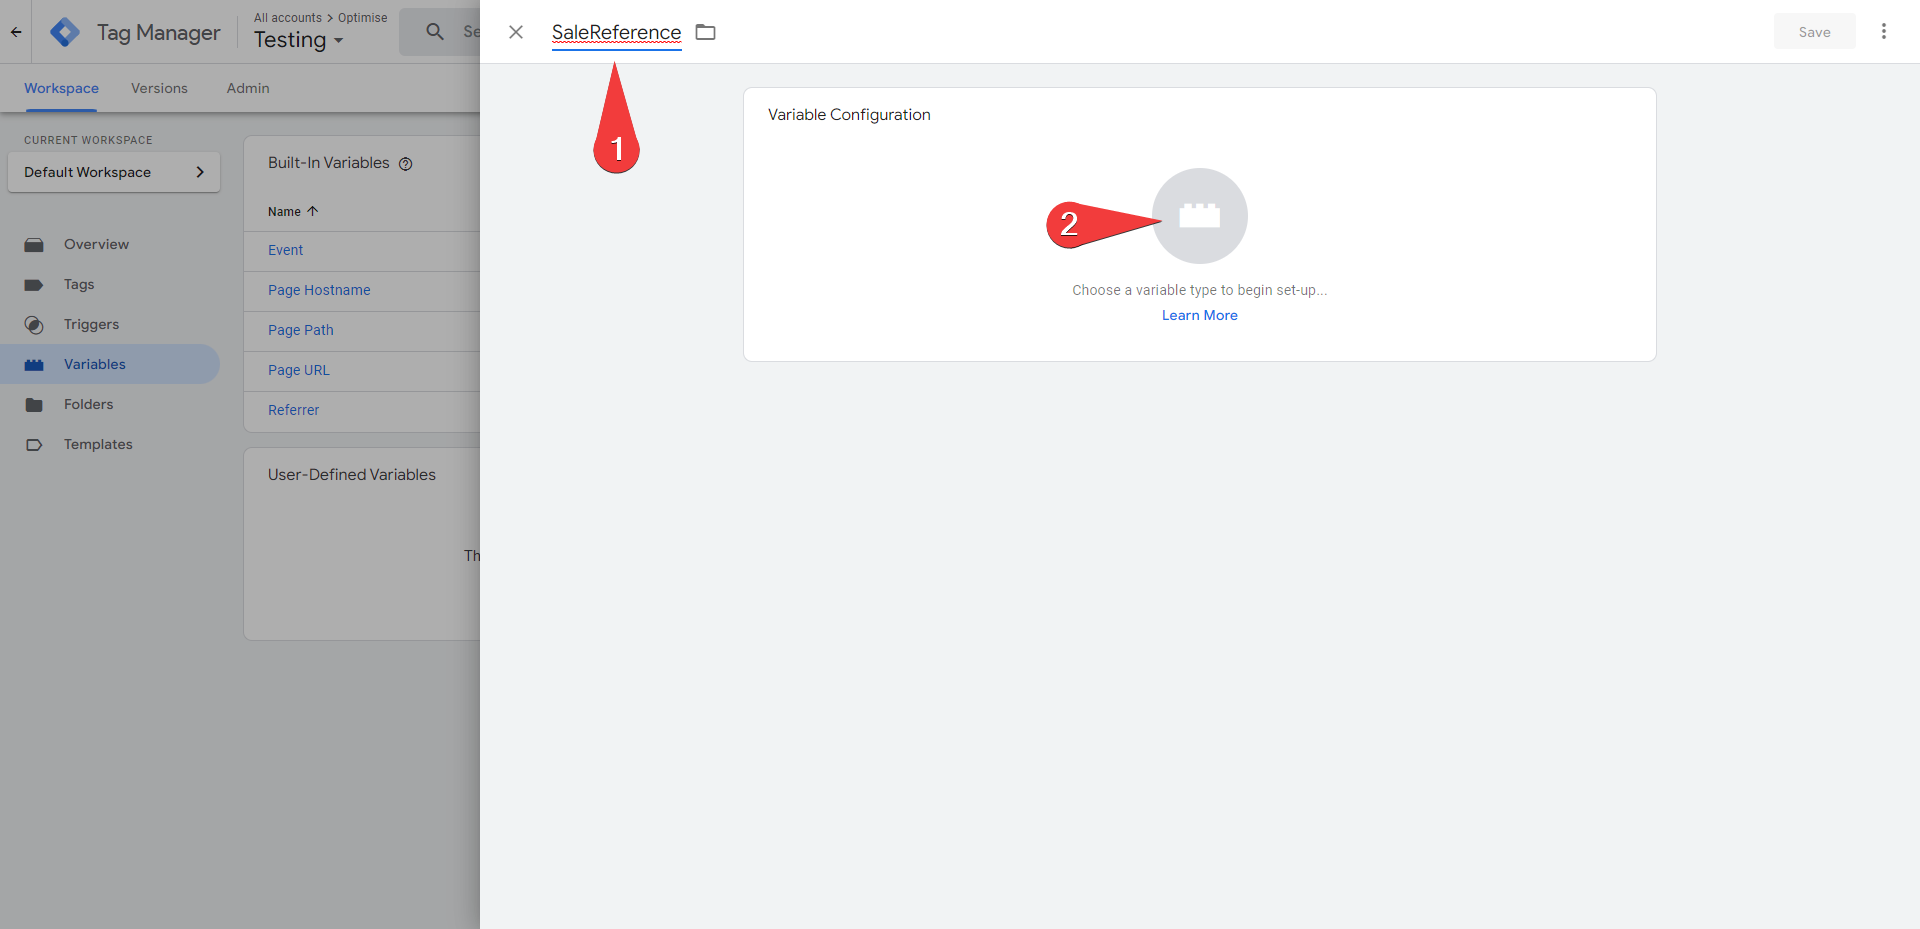
You should then create the variables from the Data Layer within Google Tag Manager, so they are accessible by heading to the Variables tab on the left hand side:
i.
ii.
iii.
-
Once the variable has been created you can reference it in your Tags through a macro format like:
{{SaleReference}}: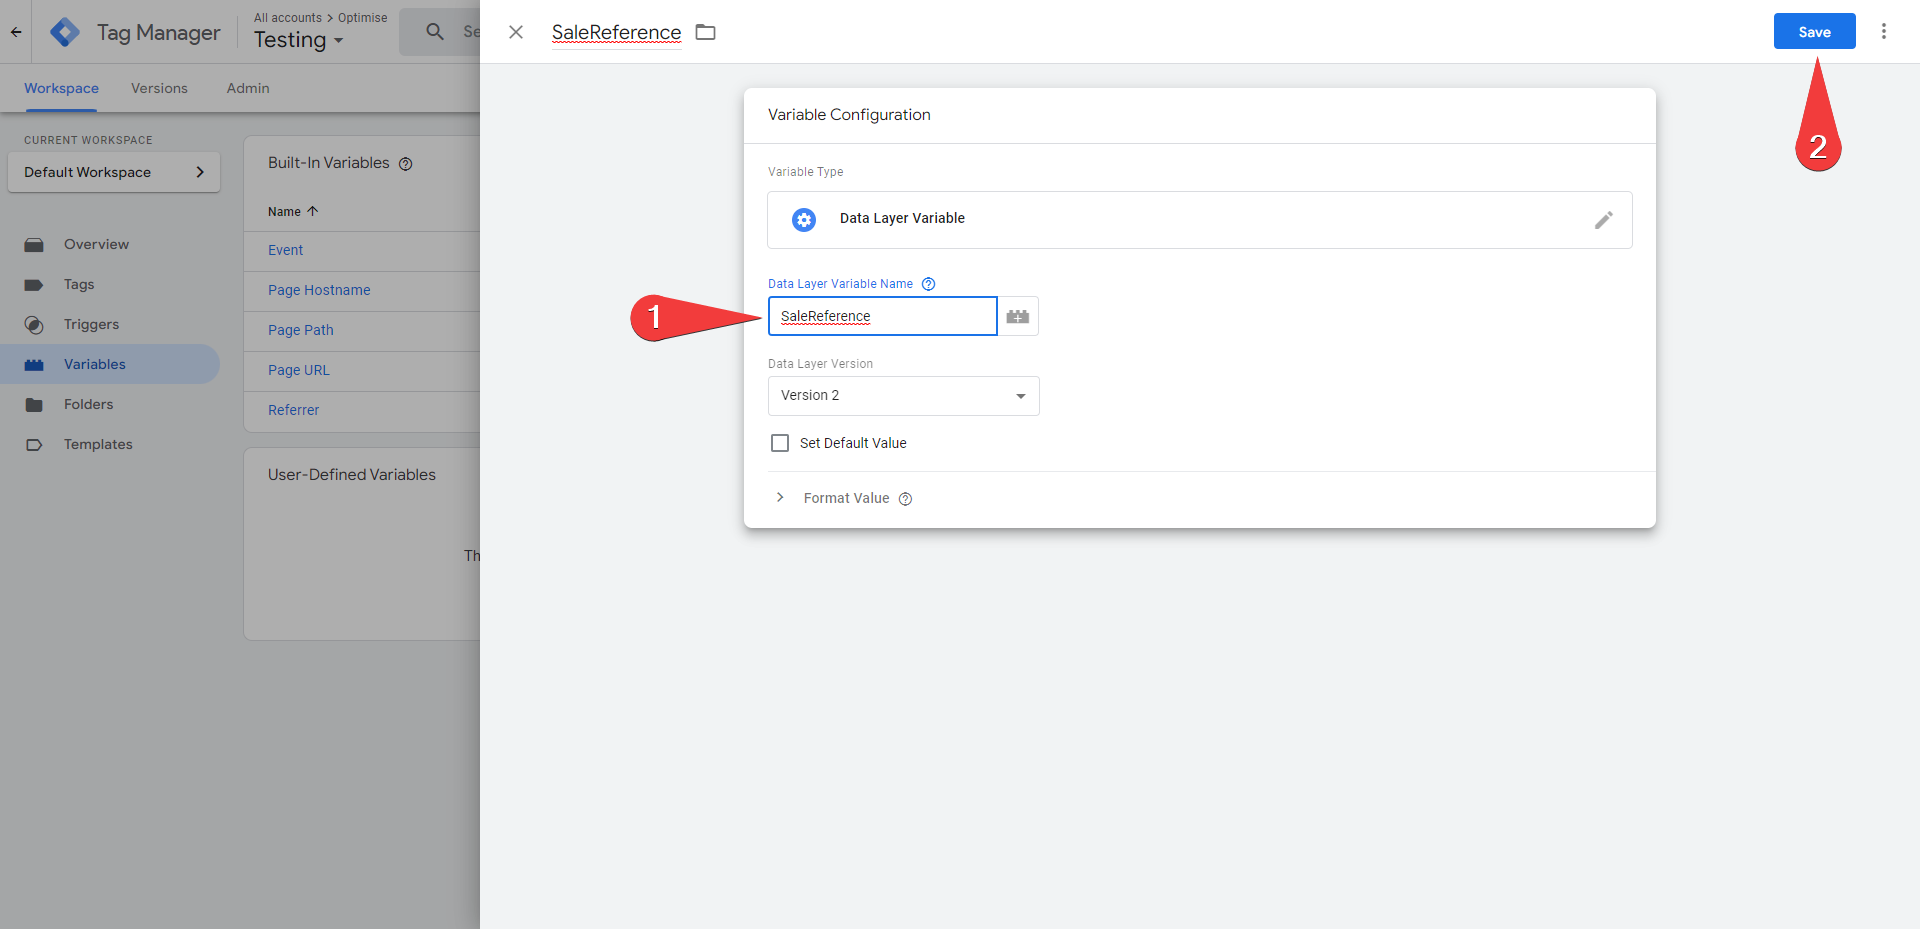
-
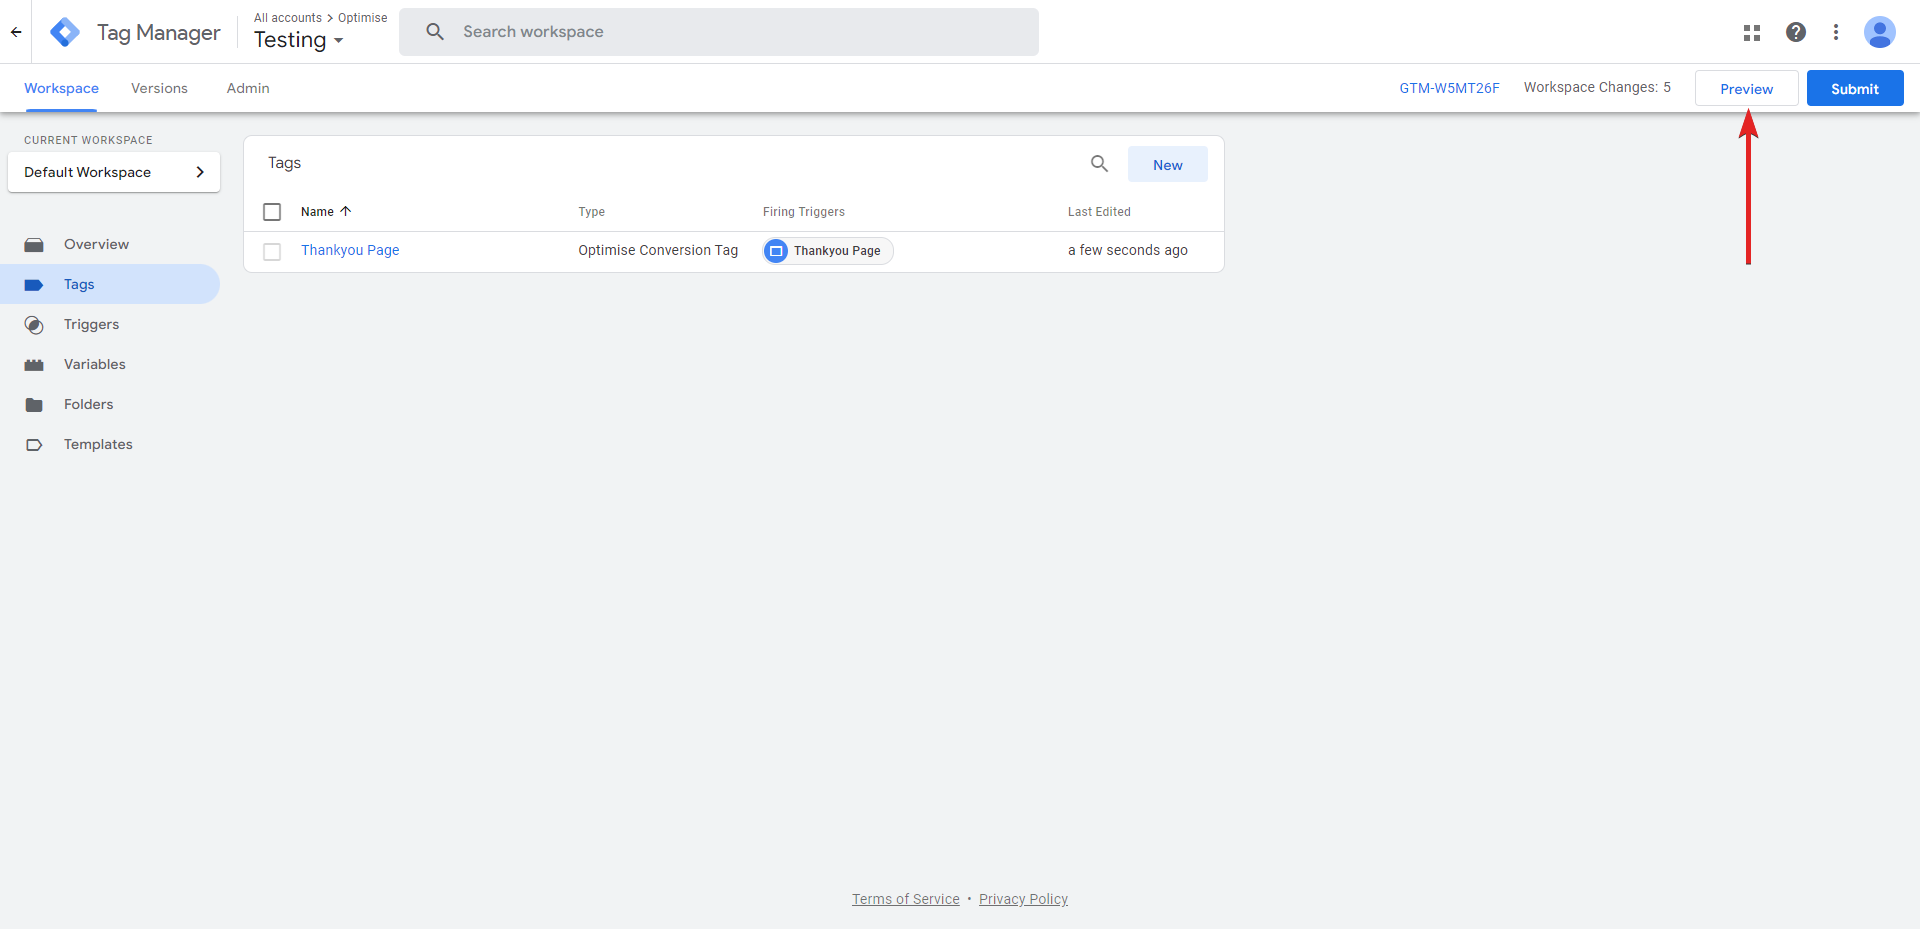
You can then Preview your tags, triggers and variables by using the Preview button at the top right of the Tags screen, selecting Submit if correct:
Magento
For clients using Magento we recommend following the instructions below. This integration guide applies only to Magento 1.x.
Magento Conversion Tag
-
Add the Conversion Tag to the Checkout Success page and include the relevant data items.
-
Locate the checkout success page at:
/var/www/html/magento/app/design/frontend/base/default/template/checkout/success.phtml -
You will need to insert the following code blocks into the page.
-
Add the PHP block at the beginning of the file (or at a relevant point where you need to retrieve order details):
<?php
$lastOrderId = Mage::getSingleton('checkout/session')->getLastOrderId();

$order = Mage::getModel('sales/order')->load($lastOrderId);
$basket = $order->getAllItems();

$allData = $order->getData();
$orderValue = $_totalData['grand_total'];
$shippingValue = $_totalData['shipping_amount'];
$voucherCode = $_totalData['coupon_code'];
$currency = Mage::app()->getStore()->getCurrentCurrencyCode();
?> -
Add this JavaScript block immediately immediately after the PHP block, ensuring it is placed before
</body>for tracking purposes:<script type='text/javascript' src="https://track.omguk.com/e/ss/?AppID=<?php echo $lastOrderId; ?>&MID=%MID%&PID=%PID%&Status=&TransactionValue=<?php echo $orderValue; ?>&Cur=<?php echo $currency; ?>&Channel=Optimise&Vcode=<?php echo $voucherCode; ?>"></script>
<noscript><img src="https://track.omguk.com/e/si/?AppID=<?php echo $lastOrderId; ?>&MID=%MID%&PID=%PID%&Status=&TransactionValue=<?php echo $orderValue; ?>&Cur=<?php echo $currency; ?>&Channel=Optimise&Vcode=<?php echo $voucherCode; ?>" border="0" height="1" width="1"></noscript>
-
Ensure you replace %MID% and %PID% with the values supplied to you.
Magento Universal Event Tag
To include the Universal Event Tag on every page, locate the view.phtml file:
/app/design/frontend/[your package]/[your theme]/template/catalog/product/view.phtml
And enter the following code:
<script type="text/javascript">OMID={%MID%};OPID={%PID%};ORef=escape(window.parent.location.href);!function(){var a=document.createElement("script");a.type="text/javascript",a.async=!0,a.src="//track.omguk.com/e/qs/?action=Content&MID="+OMID+"&PID="+OPID+"&ref="+ORef;var b=document.getElementsByTagName("body")[0];if(b)b.appendChild(a,b);else{var b=document.getElementsByTagName("script")[0];b.parentNode.insertBefore(a,b)}}();</script>
Ensure you replace %MID% and %PID% with the values supplied to you.
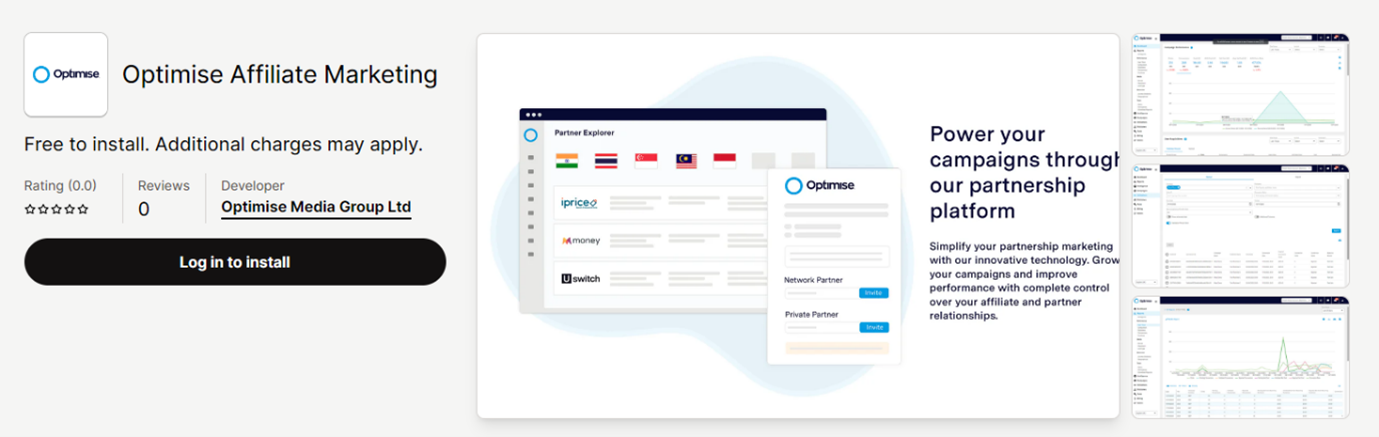
Shopify
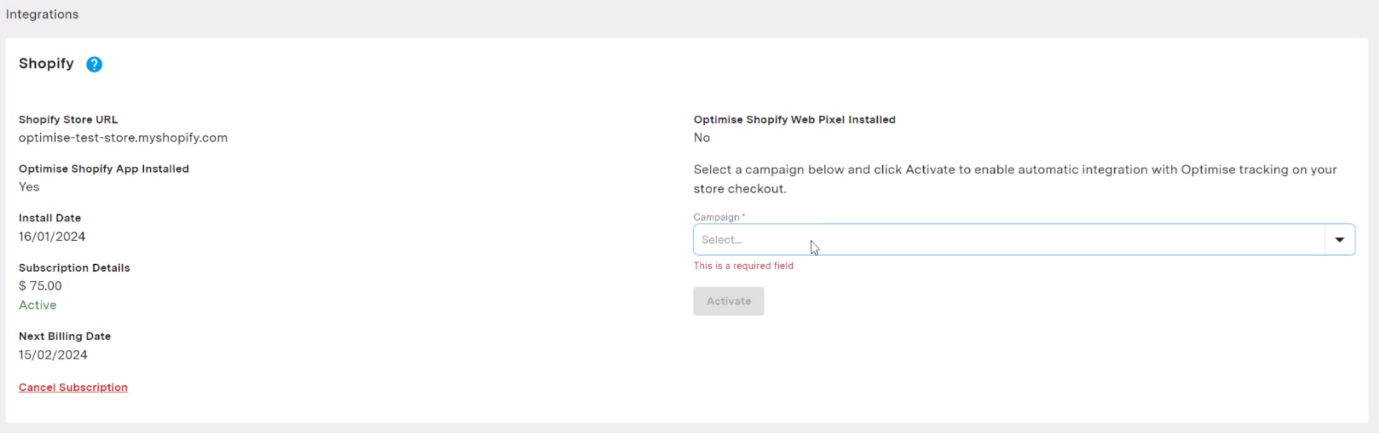
The Optimise Shopify App allows for quick integration of Universal Tracking for advertisers who have a Shopify store. It also automates the tracking via the Shopify API.
![]()
Installing the Shopify app
To install the app, please head to the Optimise Affiliate Marketing Shopify link above, then click install:
After redirecting to the Shopify apps page in the store, accept the prompt to install the app:
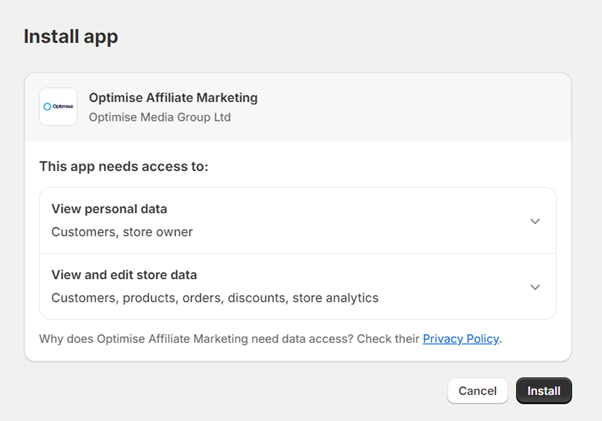
After clicking install, please login to the Insights using your log-in using credentials. If not yet registered, select the 'Sign-Up' link.
An account is required to proceed with installing Shopify.
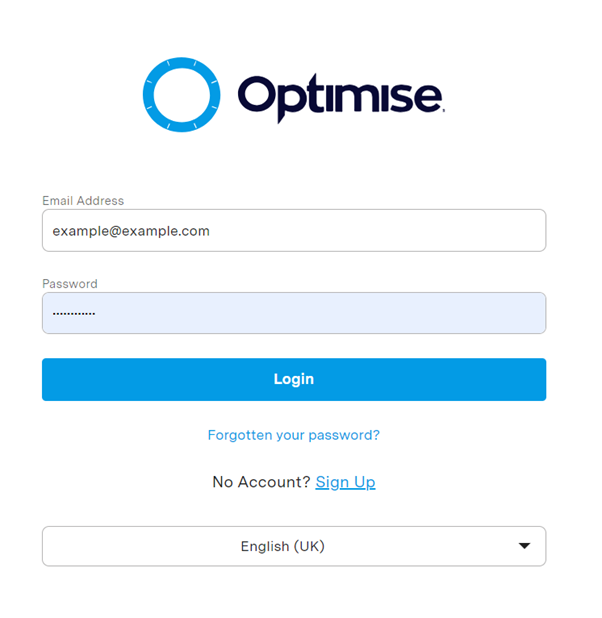
From here, please select a campaign to associate the Shopify app with. This campaign will then be where tracking link for publishers will be displayed.
Validations process
- Once installed, and campaign tracking is setup, any orders subsequently placed via the tracking links will be linked back to this campaign. The validation set-up will still need to be set up on the campaign details as per all campaigns in Insights.
- The validation process for Shopify campaigns will follow the normal validations rules, however a limitation with Shopify is that we can only retrieve order information from the last 12 weeks. This means that the validations period must be set to begin after two months and end in a maximum of three months.
- If an order is cancelled / refunded within the validation window set, we automatically receive this information from Shopify which will mark that conversion as rejected.
- If just one item from an order if refunded the conversion value will be amended for that transaction but will remain pending approval, unless the entire order is subsequently cancelled / refunded.
Invoicing
Invoicing will follow the standard Optimise process.
Product Feeds
After installing the Shopify app, your Shopify product inventory feed will automatically be imported into the Product Feeds section under Tools. This will then be updated on a daily basis automatically.
Voucher Codes
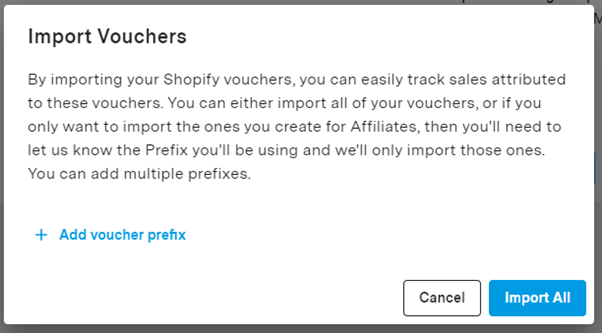
These can be imported from voucher codes created in Shopify. You can specify whether they want to import all of the vouchers created in their Shopify store, or specific codes starting with a certain prefix — such as AFF. Multiple prefixes can be specified.
To import vouchers, a please click the Import Vouchers button on the integrations card for Shopify.
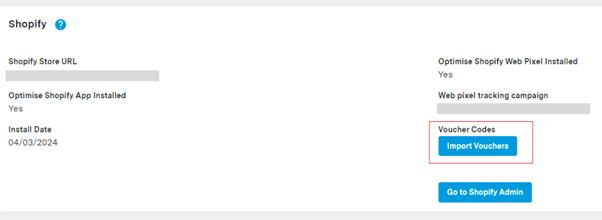
A pop-up will then appear where a user can click Import All, or specify which prefixes for vouchers they want to import.
Uninstalling the Shopify App
- If at any point you want to remove Shopify from your account, after uninstalling all permissions will be revoked and session details will be removed from our database.
- Your account will remain active on Insights, but all information pertaining to Shopify will cease.
If there any outstanding validations, these will then need to be completed manually.
Squarespace
To integrate with Squarespace, follow the steps outlined below. After completing the setup, perform a test transaction to verify tracking.
A Business or Commerce account is required use Squarespace's Code Injection feature.
How to access the Code Injection Settings in Squarespace from the Home Menu:
- Navigate to Settings.
- Click on Advanced.
- Select Code Injection.
Add the Universal Event Tag in Squarespace
- Locate the Footer section on each page along the user journey and paste the following code into the provided box:
Ensure you replace %MID% and %PID% with the values supplied to you.
<script type="text/javascript">OMID={%MID%};OPID={%PID%};ORef=escape(window.parent.location.href);!function(){var a=document.createElement("script");a.type="text/javascript";a.async=!0;a.src="//track.omguk.com/e/qs/?action=Content&MID="+OMID+"&PID="+OPID+"&ref="+ORef;var b=document.getElementsByTagName("body")[0];if(b)b.appendChild(a,b);else{var b=document.getElementsByTagName("script")[0];b.parentNode.insertBefore(a,b)}}();</script>
Add the Universal Conversion Tag in Squarespace
- Locate the Order Confirmation Page section and paste the following code into the provided box:
Ensure you replace %MID% and %PID% with the values supplied to you.
<script type='text/javascript' src="https://track.omguk.com/%MID%/e/ss/?AppID=%SaleReference%&MID=%MID%&PID=%PID%&Status=&Action=Sale&TransactionValue=%TotalOrderValue%"></script>
<noscript><img border="0" height="1" width="1" src="https://track.omguk.com/e/si/?AppID=%OrderID%&MID=%MID%&PID=%PID%&Status=&Action=Sale&TransactionValue=%TotalOrderValue%"></noscript>
WooCommerce
For clients using WordPress & WooCommerce we recommend using the PRO Version of the Tracking Code Manager plugin. Once installed use the following tracking tag template.
<script type='text/javascript' src="https://track.omguk.com/e/ss/?AppID=@@SaleReference@@&MID=%MID%&PID=%PID%&Status=&TransactionValue=@@Total@@&Cur=@@CURRENCY@@&Channel=Optimise"></script>
<noscript><img src="https://track.omguk.com/e/si/?AppID=@@ORDERID@@&MID=%MID%&PID=%PID%&Status=&TransactionValue=@@TOTAL@@&Cur=@@CURRENCY@@&Channel=Optimise" border="0" height="1" width="1"></noscript>
The tracking described above is only basic and does not utilise Item, Basket or Voucher Code Tracking. Further instructions can be found:
Custom thank you pages may prevent macros @@OrderID@@, @@Total@@ and @@Currency@@ from functioning correctly.
Configure Consent
New recommendations apply for Consent. If operating in the UK please read through the below in detail to ensure you correctly handle Consent Signals. Note that some websites will stop promoting campaigns where the recommended best practice is not followed.
Depending on the territories in which your campaign operates you will need to ensure that both you and your Publishers are managing user consent correctly to comply with local privacy regulations. You should configure your Consent Management Platform (CMP) to comply with those regulations.
If you have a UK campaign you should read the Processing Consent Signals guide to ensure you comply with the PECR exemptions for reward services. This is an essential component for working with some UK Rewards websites.
Mobile App Tracking
Adding tracking onto your Mobile App and ensuring you have a robust deep linking strategy is an important part of any affiliate campaign.
As Cookies are not supported in the Mobile App environment you will need to select between either:
Enable deep linking in your App by configuring for: