Testing Your Tracking
The Optimise Test Publisher Click URL
To verify tracking, you need to generate an sskey by completing a test click that redirects through Optimise.
When proceeding through the Setup Wizard, at the testing stage you will be provided with a Test Click URL.
Once the click is completed, verify that the redirect is successful to your designated landing page, and that the sskey is generated successfully in the landing page URL query string.
Below is a brief summary and example.
- Replace
%PID%with the PID from the campaign you would like to test. - We have a designated
AIDvalue for our test publisherAIDto ensure that test sales are not automatically validated.- The
AIDcan be found in Insights > Campaigns > Your Campaign Name > Tracking > Publishers and is titledTest - Tracking (Optimise)with an AID of779.
- The
Test Tracking with Optimise's Test Publisher AID 779 Example
https://clk.omgt1.com/?PID=%PID%&AID=779
Testing Tracking with Another Publisher's AID
https://clk.omgt1.com/?PID=%PID%&AID=%AID%
- Replace
%PID% - Replace
%AID%with the publisher'sAIDthat you would like to test.
Please note that any sales tested using an AID that is not 779 must be rejected manually to avoid incurring commission costs.
Before You Start
Two tests need to be completed:
- Single Session ensures that tracking is functional during a normal user interaction.
- Multi-Session confirms that attribution is successful if the customer completes at a later date.
There are three tools available to help test your Tracking implementation:
- Optimise Tag Inspector If you are using a Chromium-based browser, you can use our Extension to check Optimise tags are being activated.
- Tracking Debug Tool is available in Insights, under Tools > Tracking.
- In-built Browser DevTools Validation available in all modern browsers.
If using a third-party tracking provider (E.g., DoubleClick), or in-house attribution logic (show / hide), you will need to provide Optimise with a redirect URL to add to our systems before completing a test.
If your site is making direct S2S calls to Optimise you won't see this from your browser using the Optimise Tag Inspector. To get results from S2S, either contact your account manager or check in Insights, under Conversions > Conversions.
If you are working with Cashback or Reward sites, and Optimise Tracking (or the tracking that you use to send conversion data or validations to Optimise) is blocked by any option(s) on your consent wall, you MUST test that your tracking cookies are exempt from requiring consent by adding:
&oConsent=1
To the test URL (e.g., https://clk.omgt1.com/?PID=%PID%&AID=%AID%&oConsent=1) and rejecting all cookies.
For more information please see the Processing Consent Signals article.
Single Session Test
To verify tracking in a single browser session, follow these steps:
- Clear browser cookies.
- Click on your Campaign Test URL.
- Ensure it redirects to the correct landing page.
- Verify that the correct query string parameters are passed to your landing page.
- If testing Universal Tracking, proceed to Step 3.
- If testing S2S tracking, skip to Step 4.
- Check the presence of the Universal Tag on relevant pages using the Optimise Tag Inspector.
- Engage with your site as a typical user would:
- Add an item to the basket, fill out a form, or generate a lead/application.
- Complete the full process (sale, lead, or application).
- On the post-sale confirmation page, check the Universal Conversion Tag using the Optimise Tag Inspector.
- Refresh the post-sale confirmation page multiple times.
- Verify the conversion in your account's Conversions Report.
- If no conversion appears (or if duplicates are recorded), review your Conversion Tag or S2S postback configuration.
- Check that the unique sale reference (
Order ID) is displayed.- (Unless otherwise agreed, this is required for validating tracked activity.)
- Repeat steps 1-8 for each campaign.
Multi-Session Test
To test tracking across multiple browser sessions, follow these steps:
- Clear browser cookies.
- Click on your Campaign Test URL.
- Ensure it redirects to the correct landing page.
- Verify that the correct query string parameters are passed to your landing page.
- If testing Universal Tracking, proceed to Steps 3 & 4.
- If testing S2S tracking, skip to Step 5.
- Delete all track.omguk.com cookies from your browser’s privacy settings.
- This ensures the first-party advertiser cookie is tested.
- Check the presence of the Universal Tag on relevant pages using the Optimise Tag Inspector.
- Close the browser, reopen it, and go directly to your site.
- Do not click on any sponsored search results.
- Engage with your site as a typical user would:
- Add an item to the basket, fill out a form, or generate a lead/application.
- Complete the full process (sale, lead, or application).
- On the post-sale confirmation page, check the Universal Conversion Tag using the Optimise Tag Inspector.
- Verify the conversion in your account's Conversions Report.
- If no conversion appears, review your Conversion Tag or S2S postback configuration.
- Check that the unique sale reference (
Order ID) is displayed.- (Unless otherwise agreed, this is required for validating tracked activity.)
- Repeat steps 1-9 for each campaign.
Tracking Debug Tool
The Tracking Debug tool can be found under Tools > Tracking in Insights. This can be useful for diagnosing issues with Optimise Tracking Tags in real-time.
![]()
To get started, select the Campaign that you want to test.
This will load a default website URL to run the test against. You can change this URL to any address where you have Tracking Tags installed, such as a UAT or production environment.
Click START DEBUGGING. This will launch a new window which opens the URL defined above.
If a Tracking Tag is configured on this page it will instantly send a response back to the Tracking Debug Tool showing the details of the Tracking Tag. As you navigate through the website you will see a new line each time the tool registers a new Tracking Tag Event.
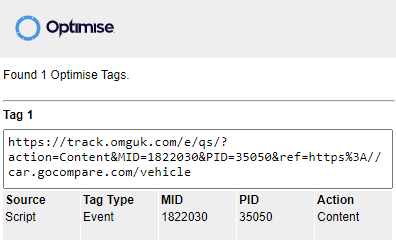
Optimise Tag Inspector
Optimise Tag Inspector is a Google Chrome Extension that makes it easy to see and verify your tracking tags are correctly implemented.
You can install the Extension directly from the Chrome Web Store: https://chrome.google.com/webstore/detail/optimise-tag-inspector/ekiippaneofjfjgokhonnfbpjlmmajdc.
Using the Extension
-
Click on your Campaign Test URL, or go to a domain where an Optimise Tag is installed.
-
Click on the icon in your browser toolbar (see below).
-
If tags are identified, they will be detailed in the extension popup window.
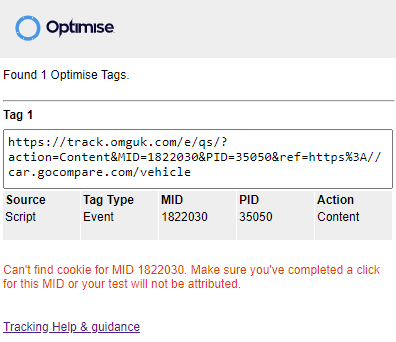
Error Messages
-
No Cookie: If a cookie for your campaign cannot be found you will see the warning detailed below. To resolve this click on the Test URL you were provided.
-
No PID or No MID found: The tag is misconfigured and does not contain a valid MID or PID value. These should be numerical values. Please check these values against the tags that you were sent by your Account Manager.
-
No AppID found: Your Transaction tag must contain a unique AppID value. This is typically a unique order or sale reference that can be used to match the Transaction offline for validation purposes. If you do not require offline validation then a random unique value can be generated and populated.
-
No Action found: Your Event tag must contain a valid Action. Please check the Event Action Values for valid
&Action=values.
Browser DevTools Validation
This guide covers Chrome DevTools, Microsoft Edge, Brave and other Chromium-based browsers. Firefox and Safari offer equivalent developer tools that provide an almost identical interface, although some menus and features differ.
Google Chrome DevTools can be used instead of, or alongside the Optimise Tag Inspector and Tracking Debug Tool to validate tracking requests, cookies, and JavaScript tag implementations in greater detail.
Chrome DevTools is particularly useful for:
- Validating Universal Tracking requests
- Confirming tracking parameters are populated correctly
- Checking advertiser first-party cookies
- Diagnosing duplicate or missing conversion requests
- Troubleshooting redirect or consent-related issues
- Verifying attribution persistence across browser sessions
This guide is only relevant if your tracking uses JavaScript tags. If your implementation uses direct S2S event or conversion postbacks, these requests will not be visible within browser DevTools or the Optimise Tag Inspector because the tracking occurs server-to-server rather than within the user's browser session.
To validate S2S tracking, review the request within your backend logs, server-side implementation, or confirm the conversion within Insights under Conversions > Conversions.
Opening Chrome DevTools
Windows / Linux
Press:
F12
If F12 does not work natively, you may need to press the:
fn
key together with the F12 key, depending on your device's setup. Alternatively, press
Ctrl + Shift + I
macOS
Press:
Cmd + Option + I
Recommended DevTools Configuration
Before testing tracking, configure DevTools to preserve requests during redirects and page navigation.
Enable Preserve Log
- Open DevTools
- Select the Network tab
- Enable:
Preserve log
This ensures tracking requests remain visible during redirects, page refreshes, and checkout navigation.
Enable Preserve Log Upon Navigation
- Open DevTools
- Press
F1or select the Settings icon - Under
Preferences → Network, enablePreserve log - Under
Preferences → Console, enablePreserve log upon navigation - Under
Preferences → Global, enableAuto-open DevTools for pop-ups
This helps ensure requests remain visible when pages open in a new tab or window.
Disable Cache
While testing, it is also recommended to enable:
Disable cache
This option is available within the Network tab and helps prevent requests loading from browser cache during testing.
Using the Network Tab
The Network tab displays all browser requests made during a session.
This is the primary location for validating Optimise JavaScript tracking tags.
Start Recording
- Open the Network tab
- Ensure the recording icon is red
- Refresh the page
- Complete the test journey or conversion process
Filter Optimise Tracking Requests
Within the Network filter bar, enter:
track.omguk.com
This filters the request list to display Optimise tracking requests only.
Depending on implementation, multiple Optimise requests may appear during redirects or conversion flows.
Multiple tracking requests can be normal depending on how the journey, basket flow, or conversion process has been implemented.
Validating Tracking Parameters
When a tracking request appears:
- Select the request
- Open the
Headerssection - Review the request URL and query string parameters
Important Tags
On the landing page, and on each subsequent page of the user journey:
| Parameter | Description |
|---|---|
qs | Optimise Universal Tag |
qi | Optimise Image Pixel |
On the sale / conversion point (to pay out on) of the user journey:
| Parameter | Description |
|---|---|
ss | Optimise Sale / Conversion Tag |
si | Optimise Sale / Conversion Pixel |
What to Check
When validating JavaScript tracking requests:
- Parameters should contain populated values
- Values should remain consistent throughout the journey where appropriate
- Requests should complete successfully
- Requests should normally return:
200 OK
If parameters are missing, blank, malformed, or duplicated unexpectedly, the tracking implementation should be reviewed.
Understanding Redirect Behaviour
During checkout or conversion flows, requests may occur across:
- Multiple domains
- Third-party payment providers
- Redirect chains
- Consent management layers
Using Preserve log allows these requests to remain visible throughout navigation.
Without this enabled, important tracking requests may disappear during page transitions.
Checking Cookies Using the Application Tab
Chrome DevTools can also be used to verify advertiser first-party cookies and Optimise cookies.
Open the Application Tab
- Open DevTools
- Select:
Application
If the tab is not visible, select the:
>>
menu in the DevTools navigation bar.
Checking First-Party Advertiser Cookies
- Expand
Storage → Cookies - Select items under your domain
Review:
- Cookie names
- Expiry durations
- Domain values
- SameSite settings
First-party cookies are typically used to maintain attribution persistence across sessions.
These cookies should normally remain present after the browser is closed and reopened unless intentionally cleared.
Checking Optimise Cookies
Within the Cookies section:
-
Review cookies associated with:
- Your domain
track.omguk.comwhere applicable
-
Confirm that:
- The cookie exists
- The value is populated
- The expiry duration is correct
- The cookie persists after navigation
During Multi-Session testing, deleting track.omguk.com cookies allows validation that the advertiser first-party cookie correctly maintains attribution independently.
Expected Validation Workflow
A successful validation process should normally follow this sequence:
- Clear browser cookies
- Open DevTools
- Enable:
- Preserve log
- Disable cache
- Click the Optimise test URL
- Confirm:
- Redirect completes successfully
sskeyis generated correctly
- Filter requests to
track.omguk.com - Complete the user journey
- Validate:
- Tracking requests fire
- Parameters are populated correctly
- Requests return
200 OK
- Check advertiser and Optimise cookies in the Application tab
- Verify the conversion appears within Insights
Common Troubleshooting Scenarios
| Issue | Possible Cause |
|---|---|
| No tracking requests visible | Tag not installed, ad blocker enabled, or S2S implementation |
Missing qs, qi, ss, or si values | Incorrect tag configuration or missing variables |
| Duplicate conversions | Confirmation page refreshes or duplicate firing logic |
| No cookies present | Consent restrictions, browser privacy settings, Consent Management Platform interference or implementation issue |
| Conversion not visible in Insights | Tracking request failed or postback misconfiguration |
| Requests disappear during redirects | Preserve log not enabled |
Consent Management Platforms
If tracking or cookies are dependent on user consent, ensure testing is completed using the correct consent state.
For Cashback or Reward publisher testing, refer to the consent guidance article regarding:
&oConsent=1
Ad Blockers and Privacy Extensions
Browser extensions such as ad blockers or privacy tools may prevent tracking requests or cookies from appearing correctly.
When testing tracking, it is recommended to:
- Disable ad blockers
- Disable privacy extensions
- Use an Incognito or Private Browsing window where appropriate
Exporting a HAR File
If additional troubleshooting is required:
- Open the Network tab
- Reproduce the issue
- Right-click within the request list
- Select:
Save all as HAR with content
This file can then be shared with your Account Manager or the Optimise Traffic support team for investigation.